Thursday Favourites: August 20th

Hey friends!

Hope you’re all having an amazing week! Honestly, my motivation has been pretty low this week, but I’m trying to power through it and get things done so I can enjoy the last few weeks of summer. Can anyone else believe it’s already nearly September? I swear, the timeline of this year has been all over the place. New Years Eve feels so recent, but thinking back to March feels like another lifetime ago — it’s really been a rollercoaster of a year.

It’s hard to feel like I’ve really been taking advantage of summer since we’re all supposed to be spending so much time inside — I guess it’s just a part of 2020’s reality we’ll have to accept, but this summer really has flown by without me even noticing it. I feel as though summer has just begun, even though we’re kind of nearing the end of it, and I guess it’s because I haven’t really done much during these summer months this year. Especially when I was in university, summer was a time of freedom, friends and exploring. Even with summer classes, summer jobs, or both, I always spent all kinds of time with friends and outside, and I usually went on one mini-adventure every summer. This year, however, between my wisdom tooth surgeries, lockdowns, and job-hunting, summer has passed me by without me even noticing it.

With summer coming to a close, I haven’t really gotten the chance to sit out in the sun and enjoy it (and likely won’t, now that I have a fresh tattoo — I guess it’ll depend how long into September the weather stays sunny and warm). However, it’s still nice to sport a nice, healthy sun-kissed glow — even if you haven’t gotten a chance to leave your house much this year.

I’m certainly no stranger when it comes to self-tanners, and I’ve tried a few out over the years with very mixed results. Every single tanner I’ve tried has had some sort of flaw that made it difficult to use. Where one would be a dark coloured cream that would apply evenly, yet stain my sheets — another would apply clear and develop over a few hours — but always seemed to turn out streaky (and often smelt terrible). It was always a bit of an uphill battle constantly fighting against smelling of fake tanner or keeping my white sheets unstained.

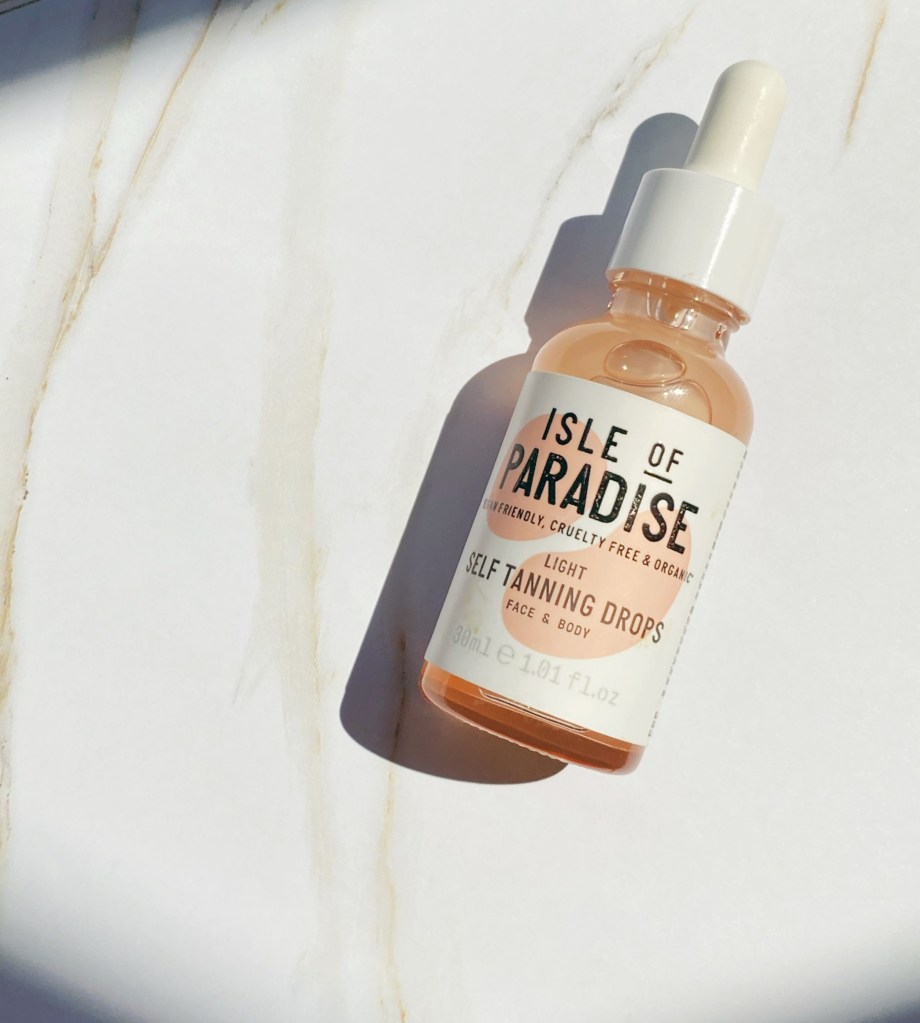
However, I feel as though I’ve finally found the solution. I’d been hearing about these new face tanning drops for a while now — it felt like so many people I knew had tried them out. I’d been hearing good reviews, so I decided to give them a go for myself.

Something pretty cool about these Isle of Paradise and their tanning products is that they come in three shades — light, medium and dark. I opted for light, since I didn’t really know how they were going to look, but I’d definitely go for medium next time around. These drops are fantastic due to their versatility — they’re made to be added to moisturizer, so you can choose exactly how dark you want to go and simply add them to your other daily products. Something that’s always frustrated me about self-tanners is how it can be challenging and annoying to use them on your body AND moisturize, but using them individually isn’t as good a moisturizer as creams. However, since using this product just means adding it into my usual moisturizer, it’s been no problem using this product daily. As well, I’d absolutely NEVER put self-tanner on my face — my whole body cringes imagining what that would do to my skin. However, I’ve found this product is gentle enough that mixed in with my usual Clinique moisturizer, it doesn’t have any ill effects on my skin whatsoever.

Another thing I adore about this product is how it doesn’t rub off and stain everything you own, while it also doesn’t have any nasty fake-tan smell to it. I usually find most tanning products either have one or the other, but this one actually manages to avoid both. It’s nearly clear and doesn’t tan your skin through simply staining it darker (which is what I find often leads to it marking up your clothes and sheets) and doesn’t particularly have much of a smell to it, so it just ends up smelling like whatever product you’ve chosen to mix it with.

So far, I’m totally obsessed with this product. Between how totally customizable they are, paired with the fact they seem to have solved the problems that arise with most other self-tanners, they’re a huge win in my books. To top it all off, I’ve yet to have any issues with streaking or uneven tanning. This product looks SO natural, I almost was worried it wasn’t working at first since unlike so many other tanners I’ve tried, it didn’t streak or look orange. It really just looks like a light tan — as if you’ve just naturally gotten a bit of colour by going about your day-to-day life (minus the weird tan lines). If you wanted a more dramatic effect, you can always go for a darker shade or a higher volume of drops-to-moisturizer, as well. It’s completely up to you!

If this sounds like the self-tanner you’ve been needing, be sure to check out Isle of Paradise at Sephora!

I hope you all get the chance to enjoy the last few weeks of the summer to the fullest! I’m a little sad and bewildered by how fast this summer went, but at the same time, I won’t lie — I love Fall, and I’m starting to get pretty fired up for some cozy Autumn vibes. (Out of curiosity, what are your favourite seasons? Mine is summer, but the older I get the more I start to prefer Fall … I love the carefree summer feeling and the warm weather of summer. On the other hand, I hate when it gets too hot, and I love Fall clothes, holidays, cozy vibes, the changing leaves and basically everything else Fall has to offer (except the rain, of course). Anyways, I digress. Let me know in the comments below what your fave season is!).

Much love,

Meredith

A Virtual Tour Of My Bedroom Decor!

Hey y’all!

Soooooo, it finally happened! After a whole year of slowly working away at decorating my apartment, I’ve finally finished up decorating my bedroom. For those of you who’ve been following my blog since last summer, you may remember that I moved into my current apartment in September of last year. Back when I moved in, I was in the middle of a huge transitional period in my life (that I’m still only now really starting to come out of) and I really didn’t have a lot of free time to myself. Between working my full-time job, figuring out and beginning classes for my final year at UBC, and moving from campus to downtown, I was pretty much swamped. When I moved into my apartment, I had just about nothing in the way of furniture — all the furniture from my on-campus apartment had to be sold as I was subletting an apartment for the months in between moves and I had no where to keep it all.

So, September rolls around and I move into my completely empty apartment. On one hand, it was a total dream — I’ve always wanted to furnish and fully decorate my own place. But on the other hand, as I’d come to discover, decorating from scratch is no easy task. It takes a lot of coordination, planning, and effort to pull it off. My apartment is a relatively small space, so not only did I have to ensure that everything would actually fit into my apartment, I had to envision how everything would look together in the space before committing to purchasing things, and of course, I had to assemble everything myself.

This all turned out to be a MUCH larger undertaking than I anticipated. It would have been challenging at the best of times, but I generally only got one day off a week, and I had a lot of other important matters to take care of in September and October while I got settled in. On top of that, it turns out that I find visualizing spaces (for example, to imagine how my place would look with certain furniture I was considering) very difficult. I essentially had to resort to slowly acquiring one piece of furniture at a time and wait until it was arrived and assembled before I could even think about picking out something else — which, of course, ended up taking forever considering my limited amounts of free time.

However, nearly a whole year later on, my apartment has finally started to really come together. While my mailroom only feels about 50% complete, it has all the furniture it needs to be a functional for everyday use, and has a couple decorations that help to make it feel like my own. My bedroom on the other hand — well, after a whole year, it’s finally complete! While I may add a couple of other decor items here and there in the future, these things will come as I happen across them, and not because I am actively searching for them.

So, I’m going to break it all down for you bit by bit — I want to explain a little bit about where everything I found is from and my process in putting it all together. In general, I found Pinterest to be the greatest tool for generating ideas, finding decor themes, and envisioning how everything would look all together. If you’re looking to decorate a space anytime soon, it’s worth checking out — it can really be invaluable if (like me) you have a hard time visualizing how things will work out. As well, I’ve linked almost everything below — some items I didn’t buy online, or I had from before and may no longer be carried by the brand. However, I linked everything I could find and attached the company I found it at and the item list on their website for those I could not!

My Bed Area

Due to the size of my bedroom and the fact that I personally wanted the largest possible bed I could squeeze into it, the only real furniture in my bedroom is my bed and bedside table. If I had opted for a single, I guess I could have fit more — such as a desk, or a chair perhaps — but honestly, I value both my comfort and sleep FAR too much for that. Out of all the furniture in my apartment, these were definitely the two trickiest — they were big and heavy, and I ended up not being able to assemble the bed frame myself. However, it came together in the end and I could not be happier with how it turned out!

Bed: Structube

Quilt: The Bay

Throw Pillows: The Bay & Wayfair (the little white one is from Amazon and I unfortunately bought it years ago but you can find similar on almost any decor site!).

My Bedside Table

This is the one piece of furniture in my whole apartment that didn’t require assembling of any sort, which was a huge blessing honestly. While I’ve had this side table for a while now, I only just settled on the decor on top recently after I had a little epiphany to use my little marble tray here instead of where I had been using it in my bathroom storage shelves previously.

Bedside Table: Structube

Marble Tray: The Bay

Vase: Anthropologie

Diffuser: Saje

Lamp: Ikea

Aloe Plant: This was from a local grocery store, unfortunately, but there’s plenty of cute plant pots you can find just about anywhere — from Canadian Tire to Amazon to local shops!

Wall Decor

This was definitely the most stressful part of decorating my room — putting stuff up on the walls feels so permanent, so it really felt important to slowly work out exactly what I wanted. As well, I spent a loooooong time measuring out where I wanted everything to go — its so challenging to get picture frames to align perfectly, and I didn’t want to make any mistakes. This was actually the final step I took in decorating my room, but I couldn’t be happier with how it turned out — it really brought everything together.

Picture Frames: Michael’s Arts and Crafts

Wall Art: AgataCreate on Etsy (you have to print them yourself, but IMO Etsy prints are one of the cheapest and easiest ways to get cute and versatile wall art).

Plant Pots: Umbra at Indigo

Final Touches

While I may not have had space for other furniture in my apartment, I still added some extra items to help bring it all together! Namely, my lamp and mirror — which were kind of necessities (there’s no ceiling lighting or other full-length mirrors in my room/apartment) and then my rug to simply help tie everything together.

Lamp: Ikea

Mirror: Ikea

Rug: Wayfair

The Finished Product!

And there you have it! It may have taken forever, but I’m absolutely in love with my room — I really love the minimalist, clean aesthetic. I find it really relaxing, which is important for me to have in my space. After all, your room is the one place that’s totally your own, and your space to wind down after a long day — I personally like mine to be a place that brings me peace and is comfortable.

Hopefully, for those of you who’ve been getting into redecorating during lockdowns, you’ve found a little inspiration from this post! If you guys have any advice for decorating in the future, please drop a comment below! I still have a little ways to go on my main room (which I’ll be sure to share with you all when it’s done) and I’d love to hear all of your best tips and tricks!

I hope you’re all having a good week! Can you believe we’re already halfway through August? On one hand, I feel like I havent even gotten a chance to enjoy summer yet, but on the other I’m honestly kind of fired up for the Fall vibes ……. I can’t be the only one who loves summer but gets crazy excited for fall come August, right?

Much love,

Meredith

Thursday Favourites: August 13th

Hey y’all!

Hope everyone’s been having a fantastic week so far! I’ve actually been pretty busy these last few weeks, between finishing up tasks and trying to squeeze in some socializing before fall (and a potential second wave comes). However, I do have some exciting news — not only have I finally finished decorating my room, but also I’ll be getting my first tattoo this weekend! Stay tuned the next two weekends, where I’ll be sharing posts detailing both more in depth for you all!

But that’s for later on. Today, I wanted to share a new favourite product of mine — NARS Laguna Paradise Found bronzer!

When it comes to makeup, my favourite part to complete is my cheeks. I’ve never had the chance to share any of my favourite cheek products with you all, as I haven’t used up/replaced any of my absolute staples since I began this blog. After all, I want to make sure I can take pictures of these products when they’re pretty and fresh for you guys! In the last year, though, I’ve been branching out and trying new products on my cheeks — and while my staples remain my favourites, I’ve tried out a couple new products that I absolutely adore and still think are worth sharing with you guys.

One of these products is NARS’s Laguna Bronzer — the one I have is their Paradise Found limited edition version with a golden overspray on top. I won’t lie — I actually bought this product on a complete whim. I already use two bronzers in my usual routine, which seemed like enough as is. But NARS is one of my favourite brands, especially for cheek products (one of their blushes is my holy grail everyday go-to) so when I saw this product, I just decided to go for it.

When I initially received and swatched this product, I honestly didn’t think I was gonna like it at first. The sheen of gold glitter coated on top seemed odd, and the swatch didn’t seem like it was all to pigmented. However, when it comes to makeup, there is more than matters about pigmentation — which is definitely true of this bronzer. Lower pigmentation can actually be a good thing for cheek products — as counterintuitive as that sounds. It can be really easy to go a little overboard with bronzer, blush and contour — so having a product that’s buildable rather than pigmented can actually make life a lot easier.

That’s exactly what I ended up loving most about this product — it’s so blendable and buildable that it almost looks as if it was airbrushed on when you apply it. Not only does that make it easy enough for anyone to use (even those who aren’t super familiar with using bronzer), but allows a truly flawless sunkissed look no matter what makeup look you’re going for. While it’s a powder, it has a rich, creamy texture that gives it a really seamless-looking effect when applied. Plus, it doesn’t take much to build this bronzer up to a good amount of product — it isn’t so light that it’s impossible to build. Ultimately, it’s lighter pigmentation just makes it easier to build and blend — rather than an ineffective or difficult product.

Unfortunately, this exact product was limited edition — but that only means you can’t get it with the golden glitter spray on top. If you’ve been needing a bronzer like this to add to your collection, no worries — NARS offers it in both matte and shimmer.

I hope everyone’s been doing well and staying healthy! These last few weeks have been kind of hectic but I feel like I may finally be on the verge of getting my life just a littttllleeee back on track (I don’t want to jinx it though!). I’m so excited for the next couple blog posts and the content I have planned out to share with you all, so be sure to stay tuned this and next Sunday to read all about everything I’ve been up to! I’ll be sharing how I decorated my bedroom with you all this weekend — I hope you’re all ready to see how it turned out!

Much love,

Meredith

Get To Know The Writer Behind The Blog!

Hey y’all!

I’m taking this post in a bit of a different direction today — I wanted to take some time to introduce you all to my real self! While I’m obviously often very open and forthcoming with all of you about my life, my schedule, and what I’ve been through in this last year, due to the nature of this blog I feel as though it limits you all from getting the full scope of who I am as a person. Many of my posts focus mainly on lifestyle, skincare, and makeup — which are some of my most favourite things in the world — but I wanted to take this time to introduce you all to a couple of the little things I love that make up who I am as a person as well!

So, without further ado, here’s a couple random facts about my interests, my favourite things, and all the little bits and pieces that come together to make me who I am!

Age: 23

Hometown: Toronto, Ontario

Currently Living In: Vancouver, British Columbia

Fave Food: Definitely either pasta or dim sum! I have so many others though — I really love tacos and banh mi as well.

Fave Travel Destination: It’s gotta be a tie between Iceland, Vietnam and Thailand!

Dream Travel Destination: Japan, Greece and Italy!

Ha Long Bay, Vietnam

Fave Movies: Howl’s Moving Castle, The Grand Budapest Hotel, The Secret Life of Walter Mitty, and I’m always down for a good action movie — but in general I’m more of a TV kind of person.

Fave Genre: Thrillers and dramas!

Fave TV Shows: Avatar: The Last Airbender, Grey’s Anatomy and Death Note.

Fave Holiday: Halloween!

Halloween 2019

Fave Skincare Brands: Biossance, Herbivore Botanicals, Fresh and Glow Recipe

Fave Makeup Brands: NARS, Anastasia Beverly Hills, and Huda Beauty.

Biossance, one of my fave brands

Fave Workout: Yoga! (If that counts as a workout, that is).

My Hobbies: Drawing, Makeup and Writing! (I’m not super ready yet to start sharing my drawings yet, since I’m just getting back into it after taking a couple years off. I’ve been experimenting with alcohol-based markers, but since I’m a long way off from truly getting the hang of using them, here’s the outline of a little doodle I did the other day before I coloured it in. No judgement — I know it’s nothing fantastic! I’ll start sharing more once I’m more practiced. Those of you with similar interests may recognize where this drawing is from, though!).

Coffee or Tea: Tea, always.

Cats or Dogs: I do love dogs, but I’m 100% a cat person. (See attached below a picture of my baby, Dmitry, who I love to show off at any given chance because I ADORE him).

My baby, Dmitry!

What I Wanted To Be When I Grew Up: When I was in elementary school, I was obsessed with the idea of being an archeologist or a palaeontologist! (Yes, Jurassic Park was my favourite movie).

Weird Fact About Me: In high school, I was an archer and I played the double bass in my school’s orchestra!

And that’s a few fun little facts about me! If any of you have similar interests or little tidbits about yourself to what I shared in this post, I’d love to hear it! The strangest thing about having a blog is that while I’ve been so personal with you all and you know so many details of my personal life, it’s often the little things that really make up our personality and who we are. I hope this post gave you a little more insight into who I am, both as a writer and as a person.

I know we all hate icebreakers, but if you guys have an interesting or similar fact drop it in a comment below! That way, when this is all said and done, we can all know each other a little better than we did before.

Much love,

Meredith

Thursday Favourites: August 6th

Hey everyone!

Today marks the third and final part of my skincare tools series! I hope you’ve all been enjoying reading it as much as I’ve enjoyed putting it together. For those of you wanting to check out the entire series, you can check out my post on Mount Lai’s Textured Jade Facial Roller and Herbivore Botanical’s Rose Quartz Roller as well!

Today, I’m going to be sharing the final tool I use in my skin care routine: the classic jade Gua Sha! Now, unlike the other tools, my current Gua Sha is just one I picked up from Amazon when this trend first came out, and I was looking to give it a try but not feeling ready to commit. However, at this point in my skincare tool journey, I’ve been looking into purchasing a new one — and I’ve had my eye on Mount Lai’s Gua Sha in particular. Even though I don’t exactly have a specific brand to share with you all at the moment, I still wanted to share what it is exactly that I love so much about the Gua Sha as a skincare tool, as truth be told, it’s my favourite out of all three.

The Gua Sha, unlike crystal rollers, is a simple curved jade tool that is used to help massage, brighten, and even sculpt the face. Unlike jade rollers, which can help with many of these but area ultimately a tool for de-puffing and soothing skin, the gua sha can really help to boost circulation and really physically push blockages down the lymphatic system. Most importantly, however, it can really help to break up muscle tension in the face, release tight areas and relax the skin of the face.

However, what makes me love this tool the most is how it actually provides a deep massage for your face. When you use this tool, you can actually feel your facial tension slowly being released and your circulation being boosted immediately (I always love the little tingly feeling you get post massage when you know it worked). Especially when it comes to areas that can contain some serious and deep-rooted knots and strain, such as your jawline, cheekbones, eyebrows, and temples, you can feel this tool popping knots and actually making a difference in your skin. Plus, relieving facial tension will help you feel more relaxed by proxy — just as being stressed will increase tension in your face, the psuedo-placebo effect of having knots in your face will cause you to believe (and therefore feel) stressed out.

And, as promised — I wanted to share a little about skincare tools that you should typically avoid as well. Now, obviously, if you’ve already been using these tools and they work for you, by all means keep using them. But rest assured, I will be explaining why to avoid them and what it is that makes them poorly suited for use of your face.

The first tool that generally should be avoided are the vacuum-style electric tools advertised to remove all the excess dirt from your pores. While I love a good deep-clean as much as the next person, these types of machines (as with basically every other method I’m going to mention) should really only be performed by a professional. There are all kind of face masks you can use to combat blackheads and clogged pores safely at home, but these tools are not only dangerous to use in terms of damaging your skin with their powerful suction — but also, you’re not trained to use them. Aestheticians go to school for a reason — these tools are challenging to use, and when used improperly can do more harm than good.

Another tool I’d generally recommend staying away from are Micro-Needle facial rollers. Once again, these types of procedures can have numerous benefits and stunning results when performed by a professional, but you should avoid attempting this one at home. Not only does the “roller” style of micro needling damage your skin, but without the proper tools to care for and sanitize your roller, all you’ll be doing is pushing bacteria that collects on the needles deep into your skin. When this procedure is performed as part of a facial, the needles are administered straight onto your skin, and the quick and direct in-and-out movement is what helps to avoid harm to the delicate skin of your face. When you use a needle roller, however, the rolling action drags the needle through your skin, creating micro-tears — which are damaging, ineffective and can even lead to scarring.

The last technique is one that I have actually tried myself, so I can speak on my own personal experiences. Microdermabrasion is a technique that has become all the rage lately, and many people try to get similar effects at home with face razors — which definitely work for some people but do require a lot of care to be used properly. While I’ve used face razors in the past on my upper brows and upper lip, there’s a couple of things you need to consider if you’re actually going to try to use a face razor on the entirety of your face.

First of all, you’ll want to make sure you know what you’re doing — so make sure to do a little research, or maybe watch a couple YouTube videos first. Second of all, you’ll want to be sure you have a good, clean and sharp razor that’ll be safe to use on your face. Finally, you’ll want to consider that there’s risks to performing this by yourself (since, once again, you’re not a professional). Shaving off your peach fuzz will make it easier to apply makeup, sure, but scraping away at your face too much can create micro-tears (or full-size cuts), ingrown hairs, and most importantly — when you remove hair from the hair follicle, it leaves it open and vulnerable to dirt and other foreign substances to make their way into your skin. Basically, I wouldn’t recommend this one either — I never used it myself more than five times, and I haven’t tried it in about a year (nor would I bother to again). Basically, what I’m trying to say is be careful with skincare tools; while some are useful, others may be damaging and should only be used by aestheticians and dermatologists. Be sure to pick what you use on your face carefully!

And there you have it! I hope you enjoyed this little segment on skincare tools — I know it’s been a little different from my normal content, so hopefully you all felt you learned something new from these last three posts. If you have any fave skincare tools of your own, drop a comment below and tell me all about them! As well, if you’ve been inspired to try any of these tools out for yourself, I’d love to hear how they work for you!

Happy Thursday, everyone! I hope August is treating you well. I know everyone’s been talking all year about how strangely time has been moving, but I really can’t believe it’s August already. I feel like the last three months specifically have been such a blur, but on the bright side — we only have four months left until we get a fresh start with 2021! I don’t want to jinx anything, but fingers crossed things will feel a lot more normal by then.

Love you all,

Meredith

UPDATE: Got my hands on the Mount Lai Gua Sha in Rose Quartz, I’m in love!