My Tarte Custom Makeup Kit Unboxing!

Hey y’all! Happy Saturday!

As I mentioned in last week’s post, I initially intended this post to be shared last Sunday, but unfortunately the package didn’t arrive in time. Sooooo, instead, I’m doing two posts this weekend! Tomorrow evening at 7pm, I will be sharing the first segment of my three-part Holiday series: My Holiday Gift Guide! Stay tuned to find out what this week’s theme will be, and read all about my best gift suggestions for this holiday season!

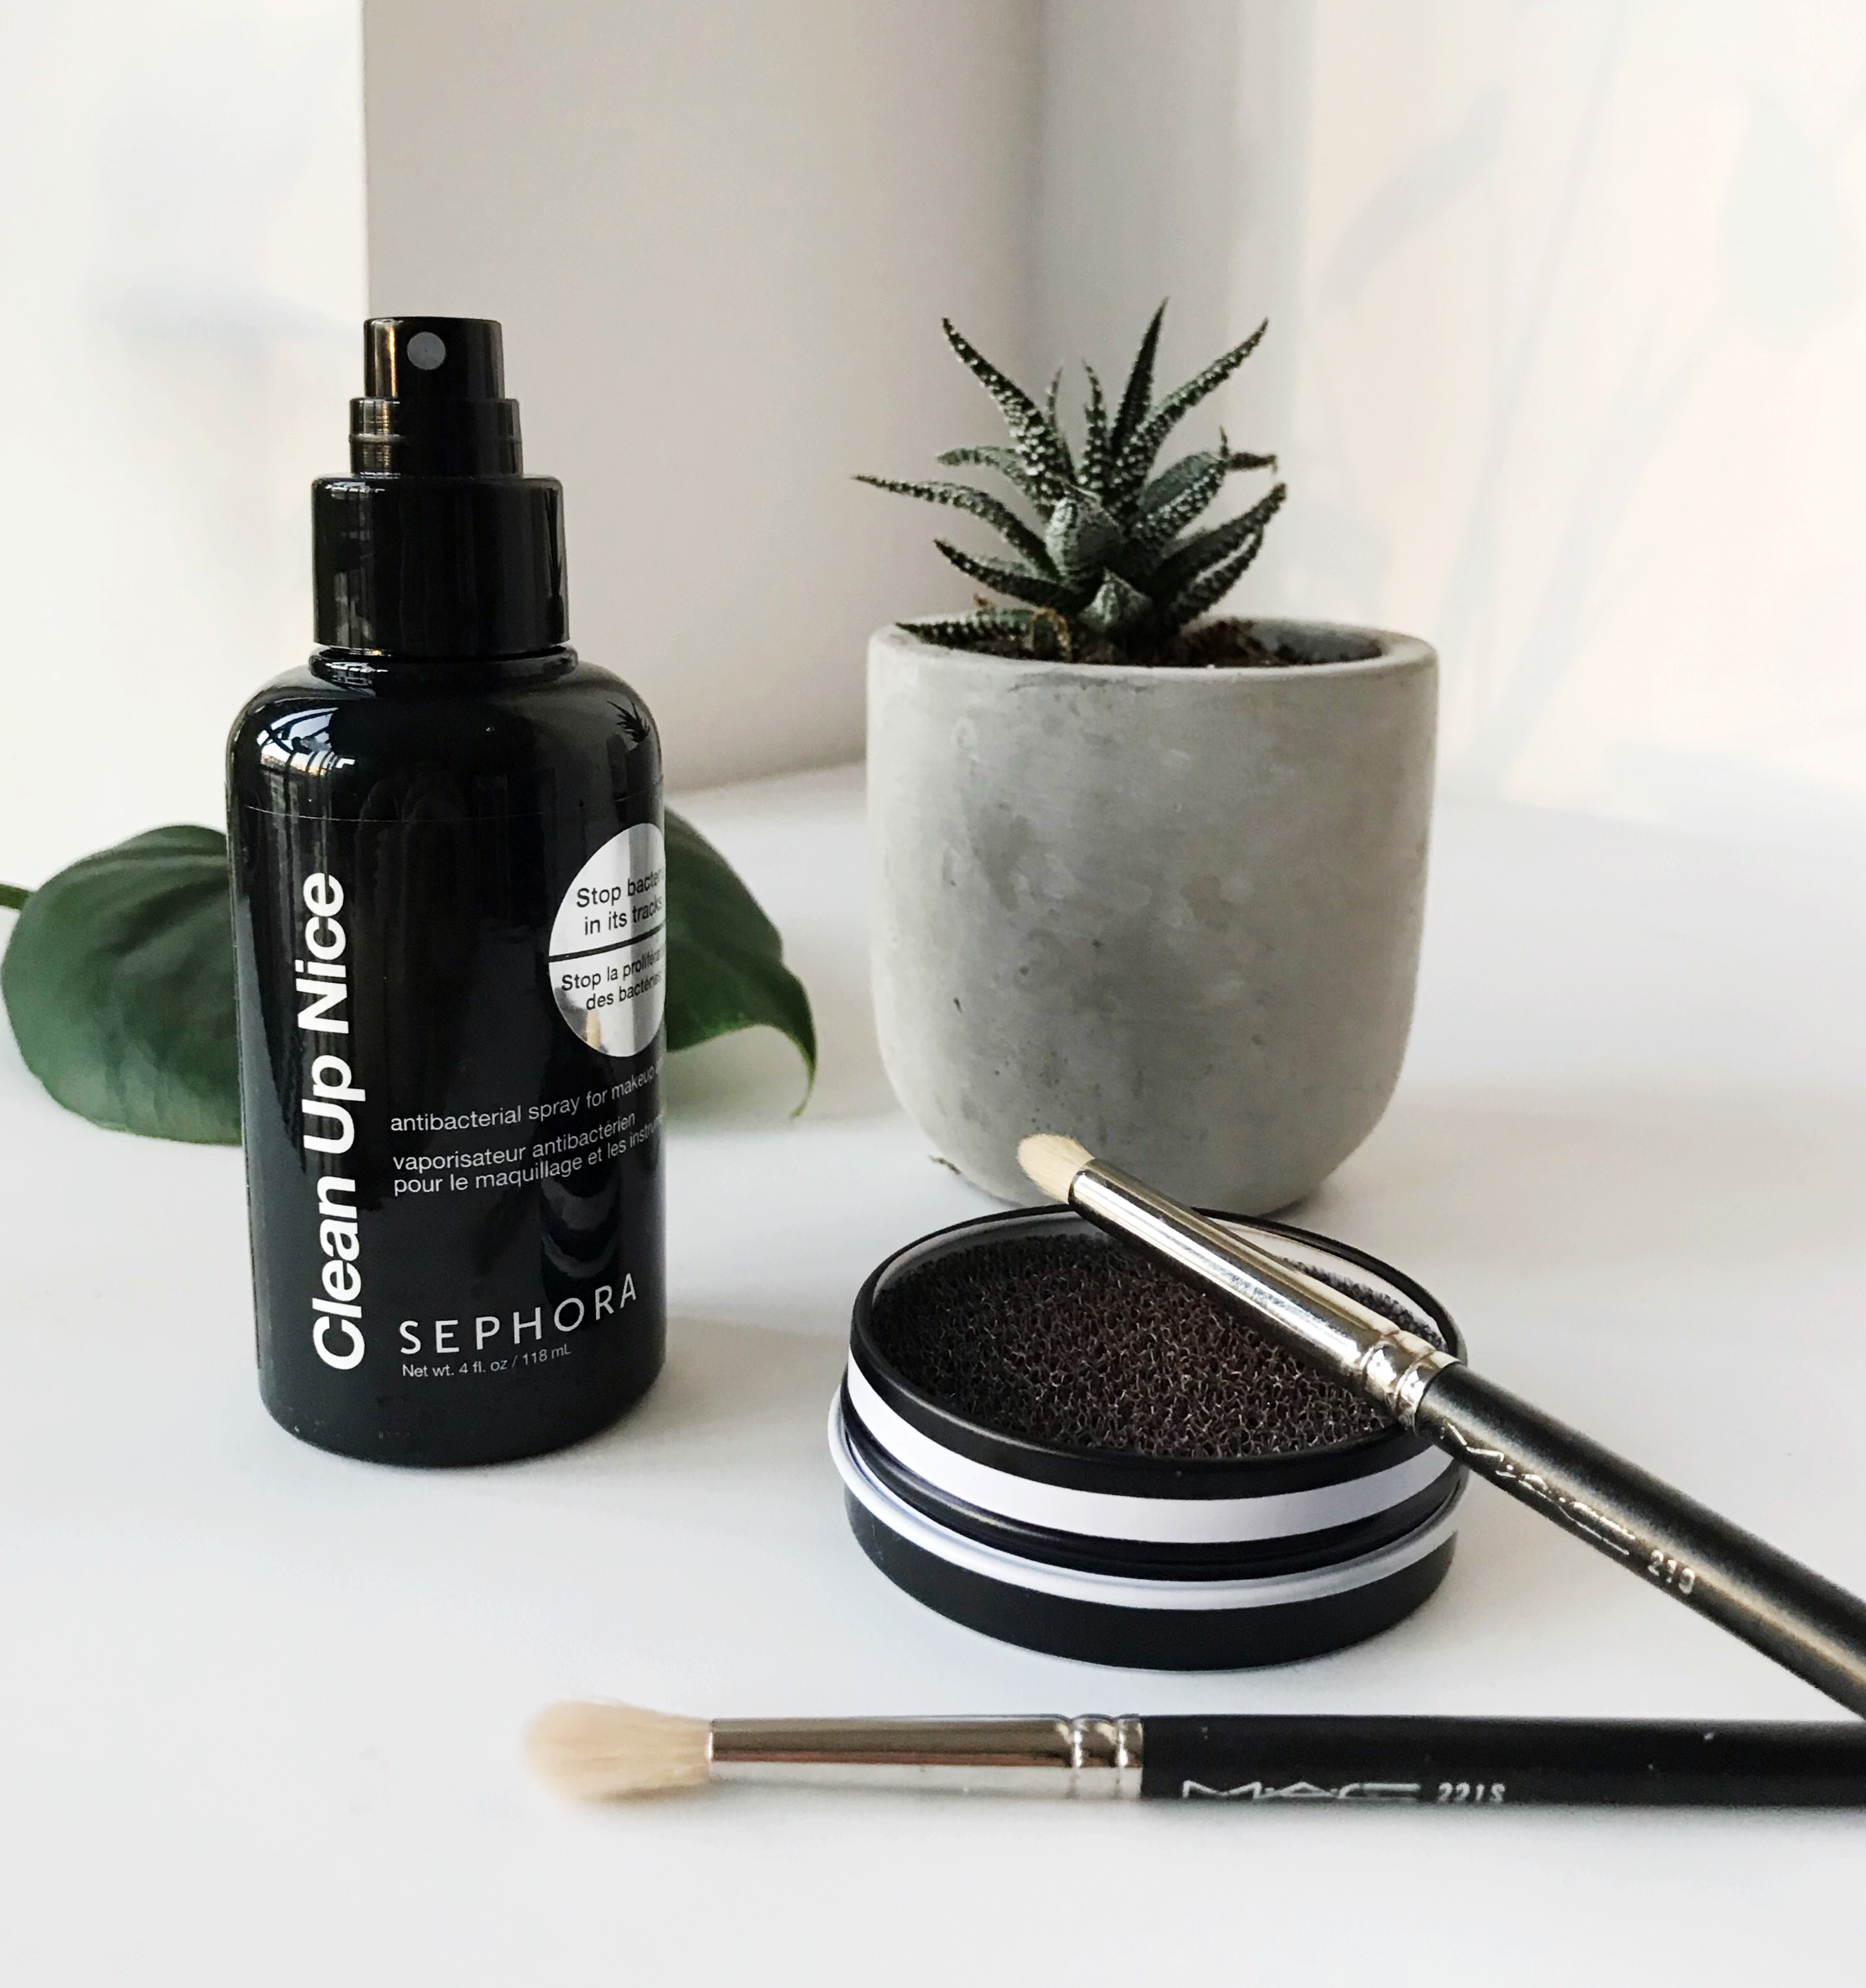
But for this post, I’m going to be unboxing my Tarte Custom Makeup Kit for you! For those of you who don’t yet know, every so often Tarte releases their Custom Makeup Kits for 24 hours — they generally announce this sale in advance via email a few days prior. When the sale hits, it only lasts for 24 hours — but you get this time to pick 6 full size products +1 makeup bag for only $84 ($63 USD) with an overall value of over $200. While I’m honestly not too sure how often they happen/if they happen a set amount of times a year, I do know they’ve certainly done many of these releases before. Every time, I hit their website and create a kit, only to hesitate at the last minute. This time, though, I finally went through with it!

As many of you already know, Tarte is one of my all-time favourite brands. Their mascara, collagen super-serum, and primer are all part of my daily skincare and makeup routines (as well as more products that I haven’t even gotten the chance to share with you all yet!). Plus, as a brand, they’re 100% vegan and cruelty-free — and all their products are dermatologist approved and hypoallergenic. All this on top of being incredibly high-quality products. What more could you ever ask for from a brand?

The only thing that held me back from purchasing these kits in the past was the fear that the sale was incentivizing me to buy products I didn’t need. Every time I would make it through to the end, but before I would send in the order, I’d stop and think if I really needed most of the products — and the answer was usually no. While such a fantastic deal was hard to skip out on, if most of them were products I didn’t truly need, it DID feel like I was wasting money and makeup for no good reason. This time, however, everything aligned perfectly so that all the products I ordered were either things I adore, was running low on, or were products I own from different brands that I was looking to switch for something new.

There are seven steps involved in creating your own custom kit — their website takes you step-by-step through choosing a foundation, cheek product, eyeliner, mascara, lipstick and makeup brush before selecting a makeup bag for your products to arrive in. However, some of the sections have a little variation in what exactly you can choose, so if you’re not in need of, for example, a new blush, there may be other options that work better for you.

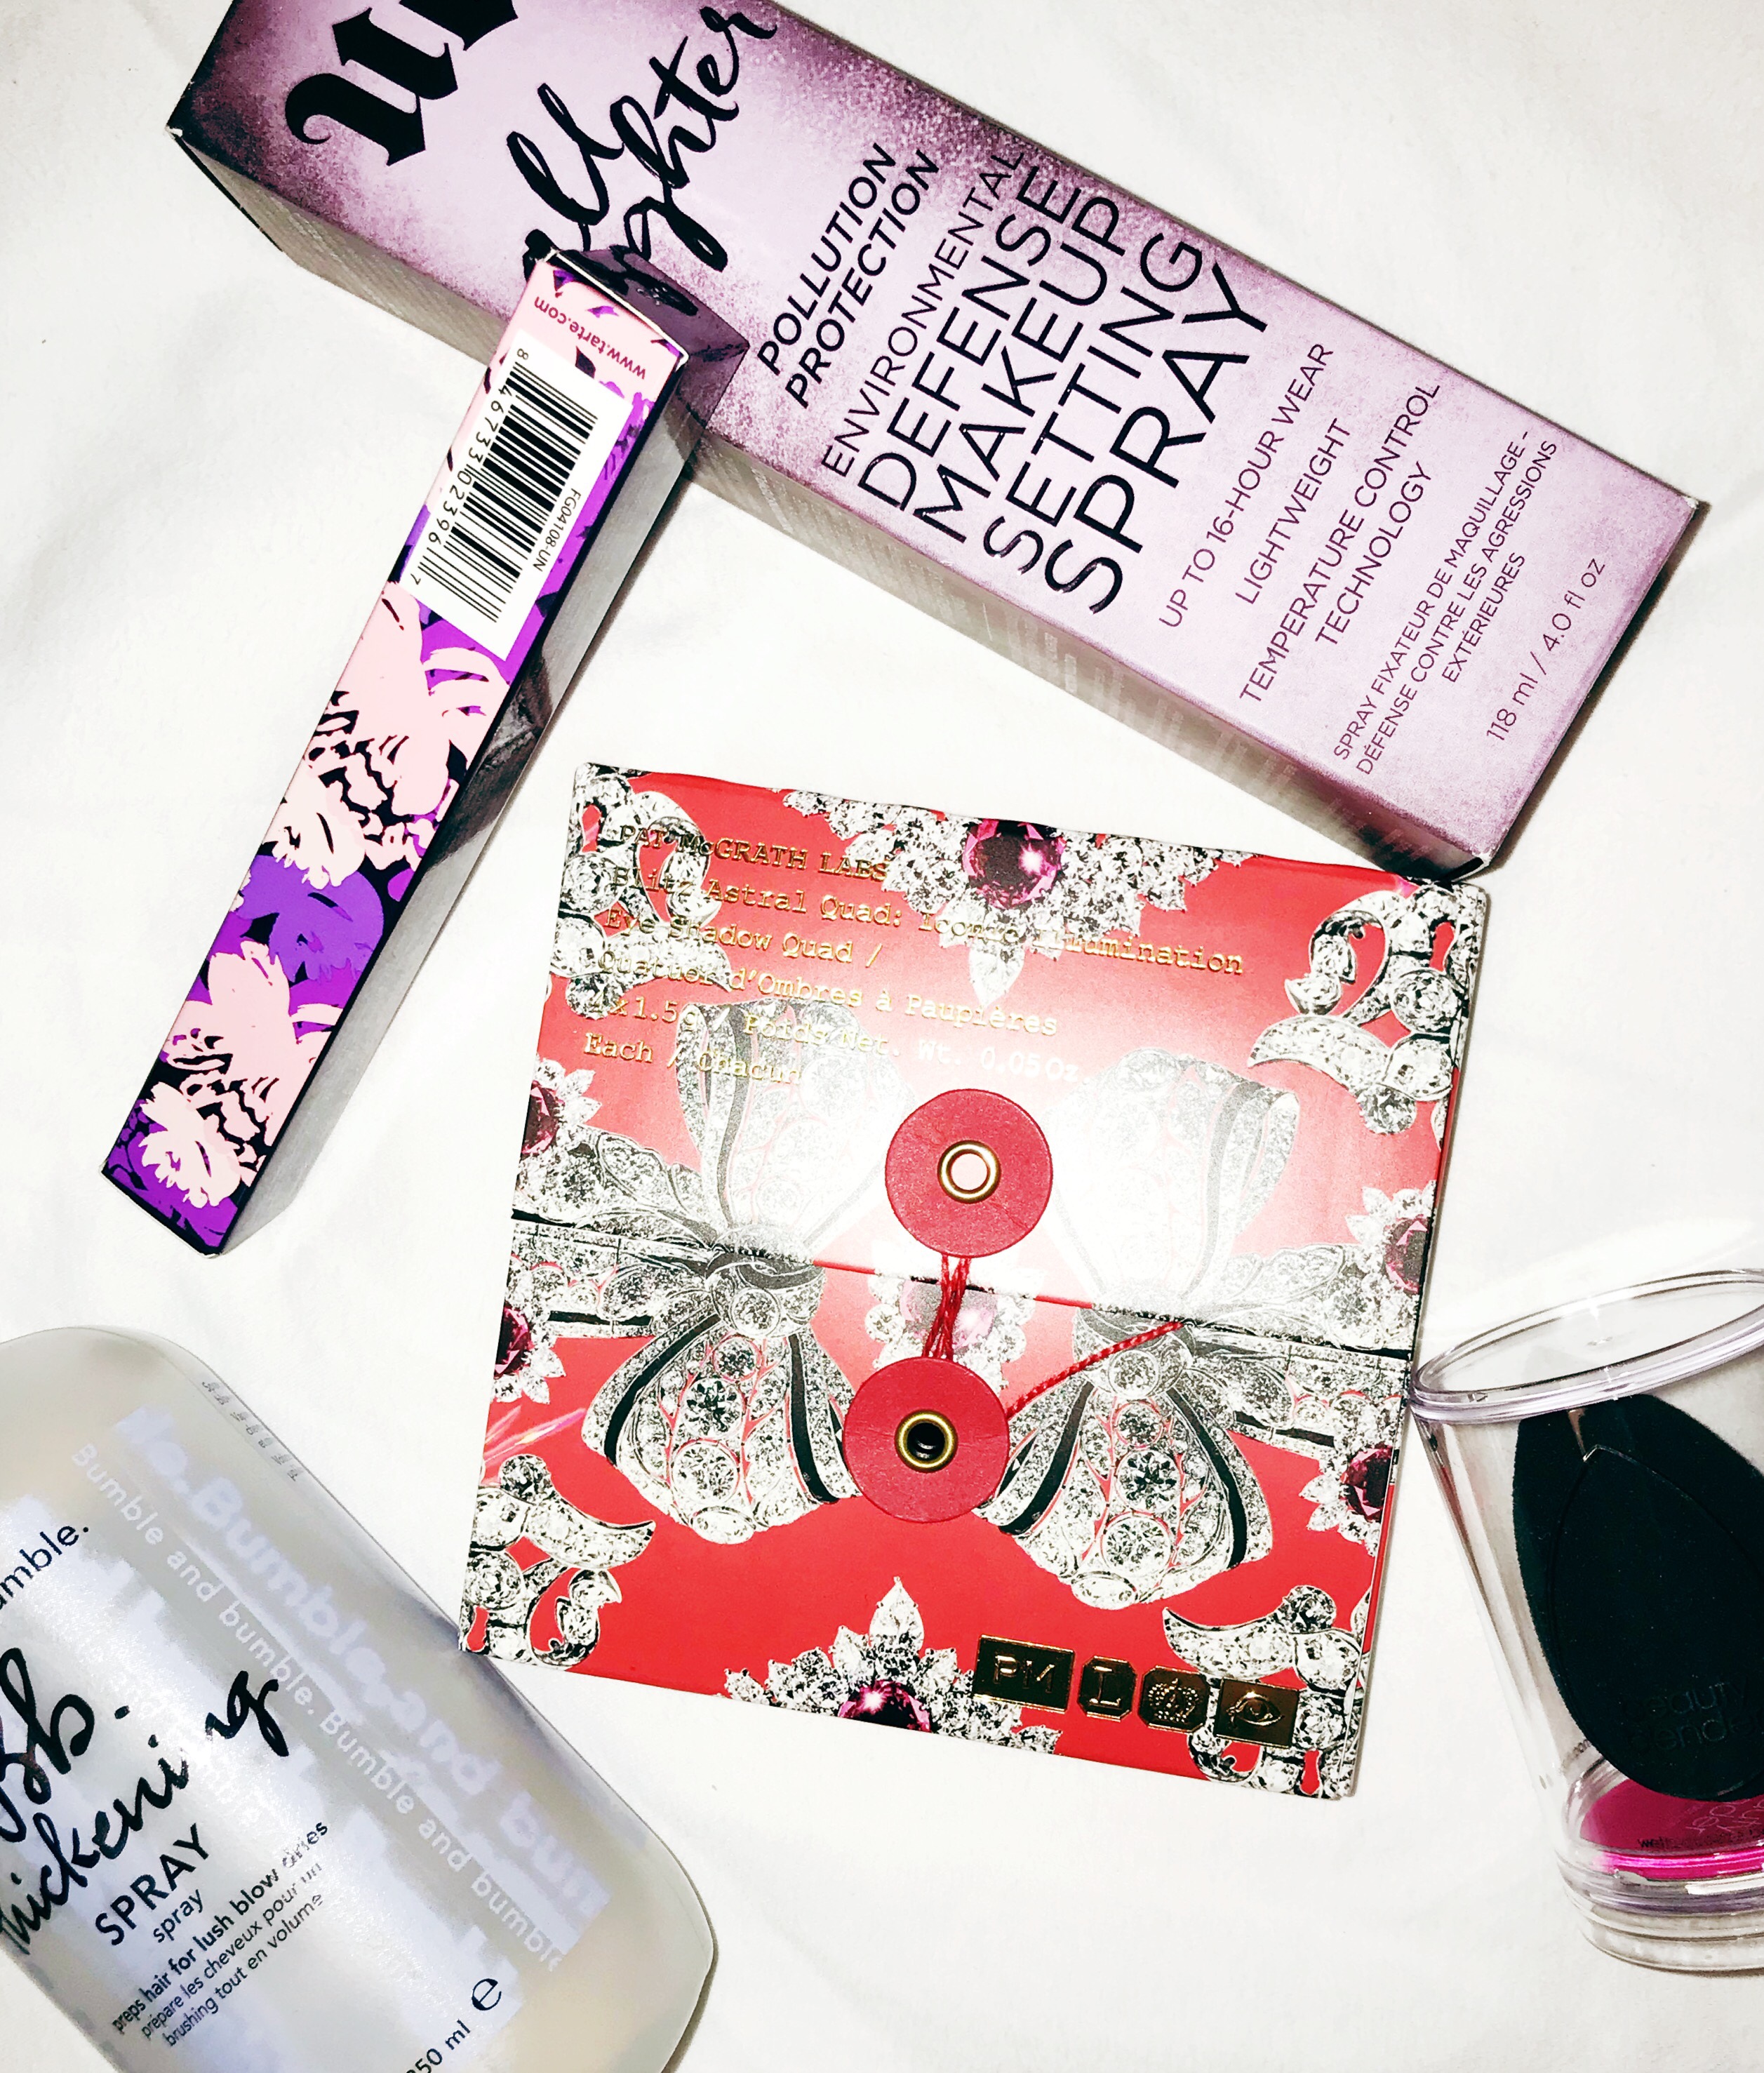
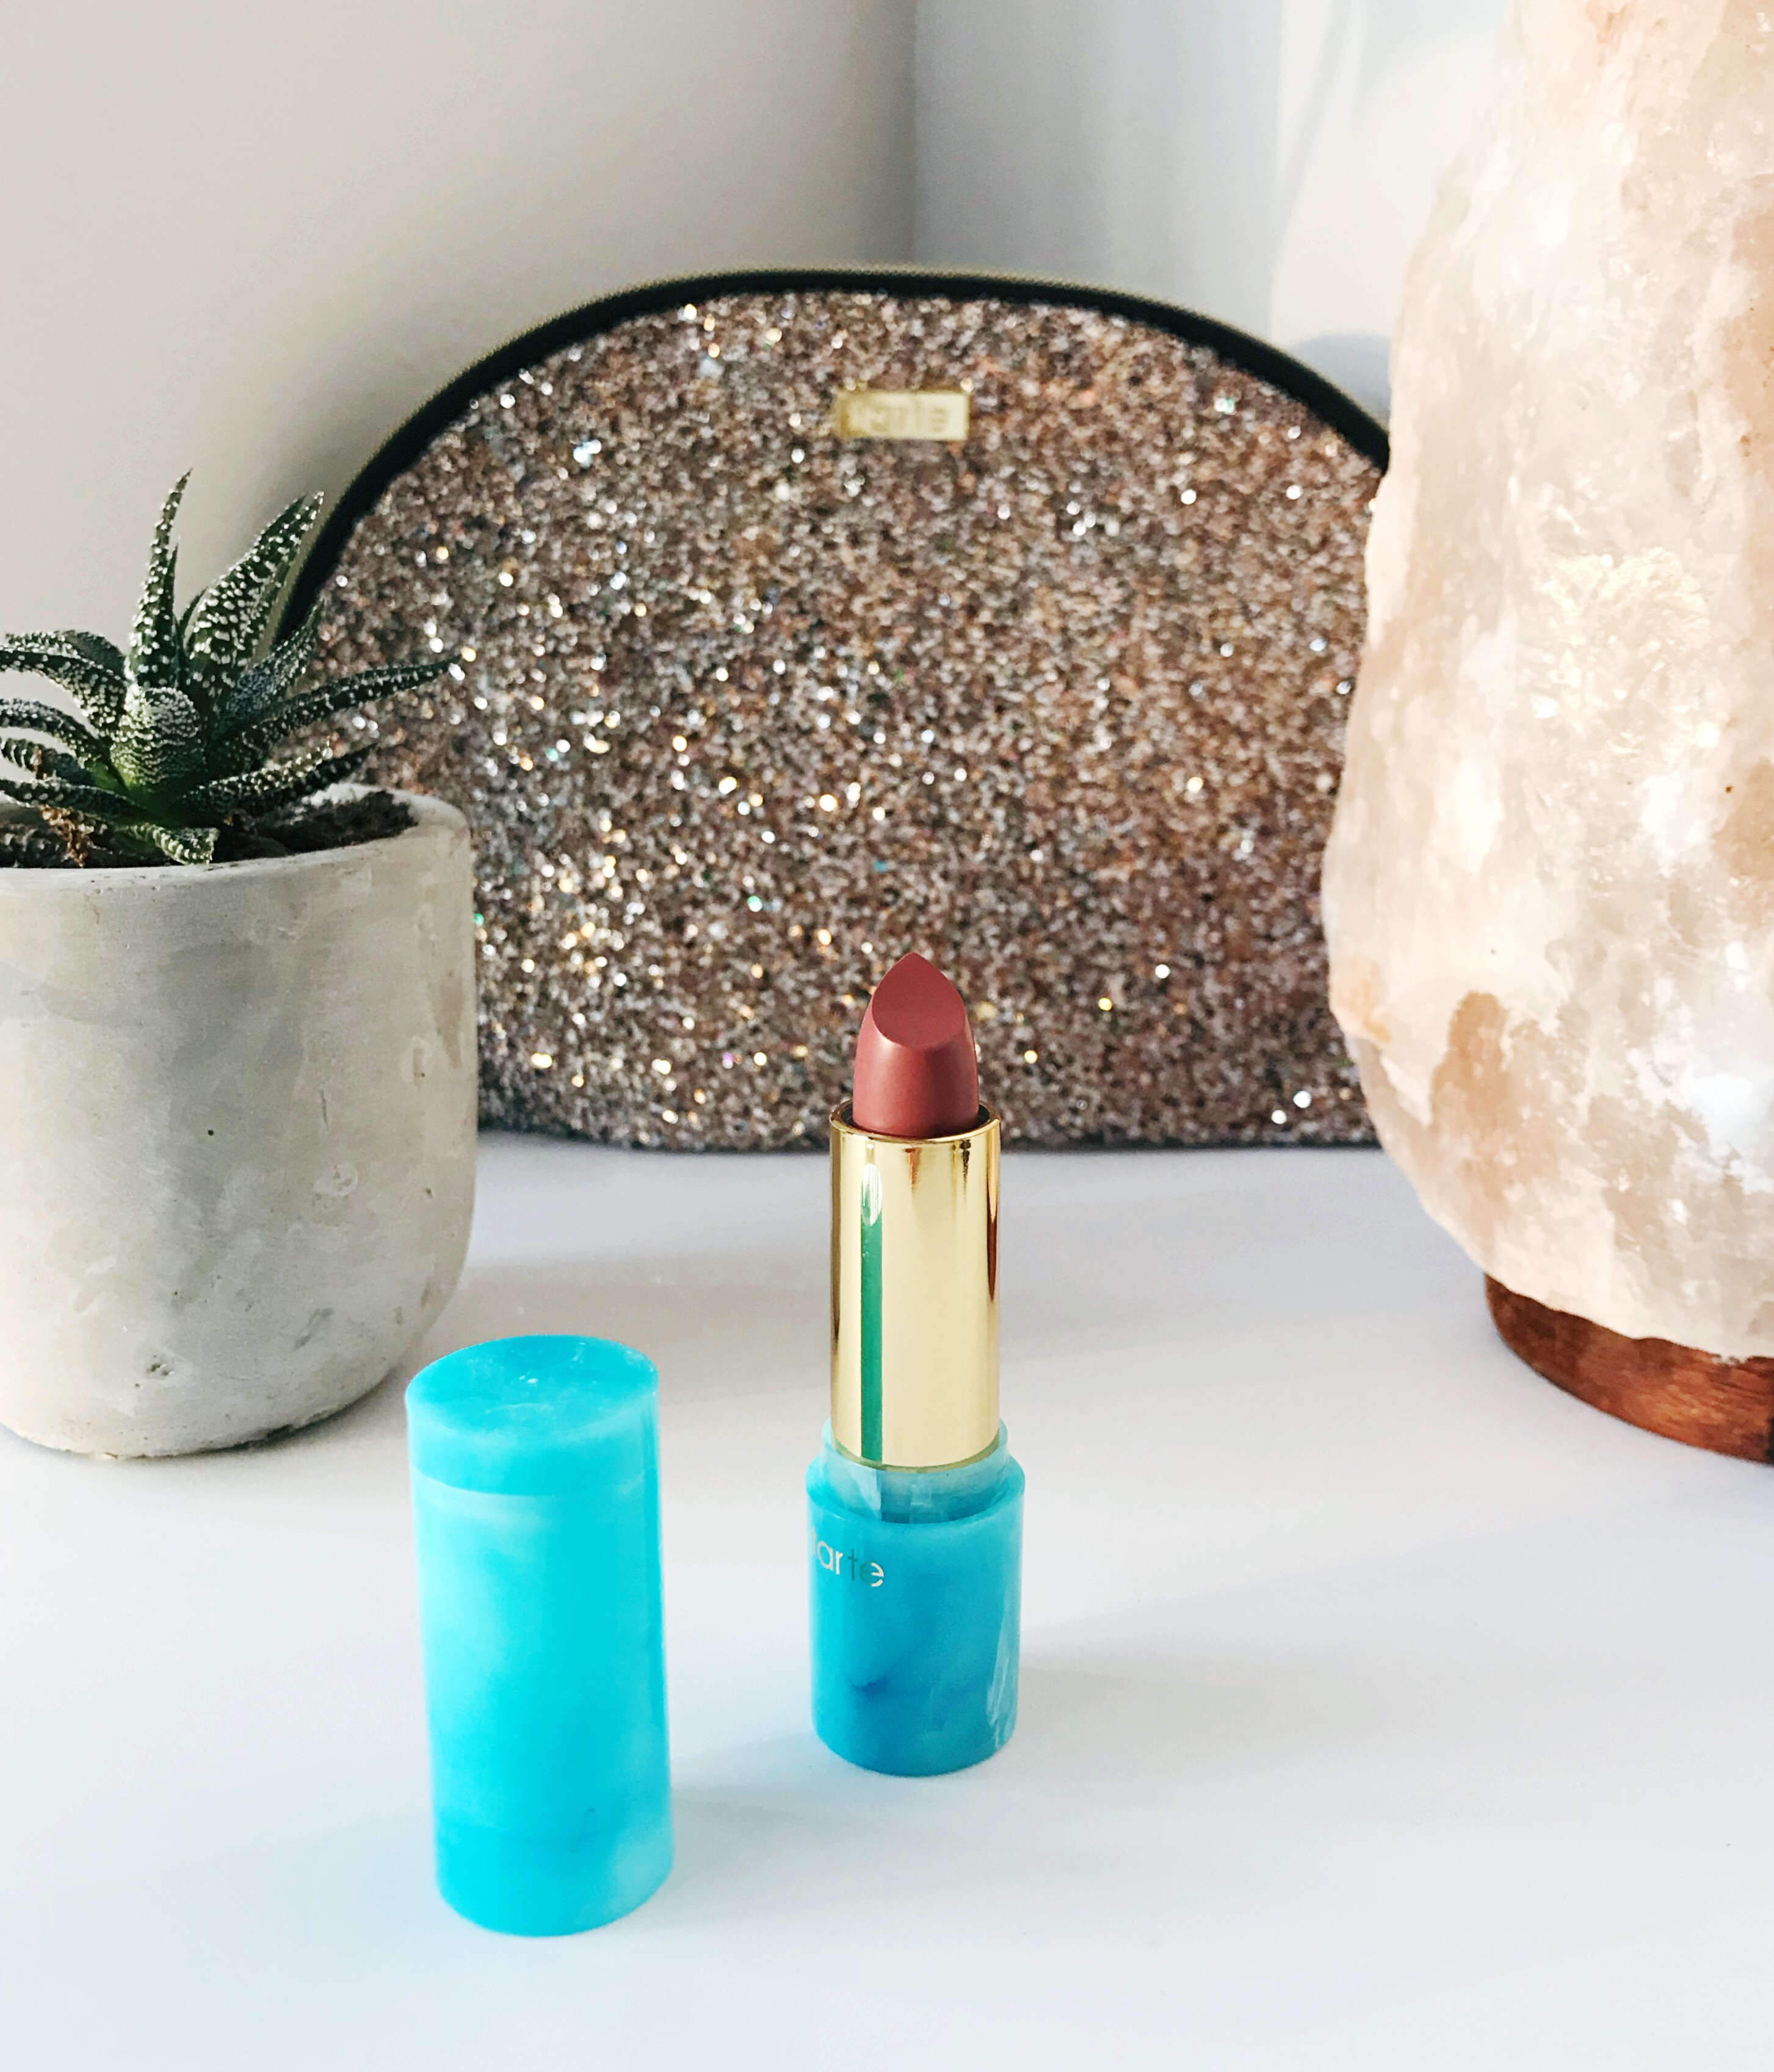
For my kit, I selected the:

  • Amazonian Clay 12-hour Full Coverage Foundation
  • Smooth Operator™ Amazonian Clay Finishing Powder
  • Clay Pot Waterproof Shadow Liner
  • Lights, Camera, Flashes ™ Statement Mascara
  • Color Splash Lipstick
  • Paddle to Perfection Foundation Brush
  • and packaged it all in the Glitter Half Moon bag!

Many of these products I’ve actually never tried before, so needless to say I just couldn’t wait for them to arrive so I could test them out and share my first impressions with you guys! So, without further ado, lets get into it! (And while we’re at it, can we just appreciate this super cute makeup bag? I’m obsessed.)

Amazonian Clay 12-hour Full Coverage Foundation

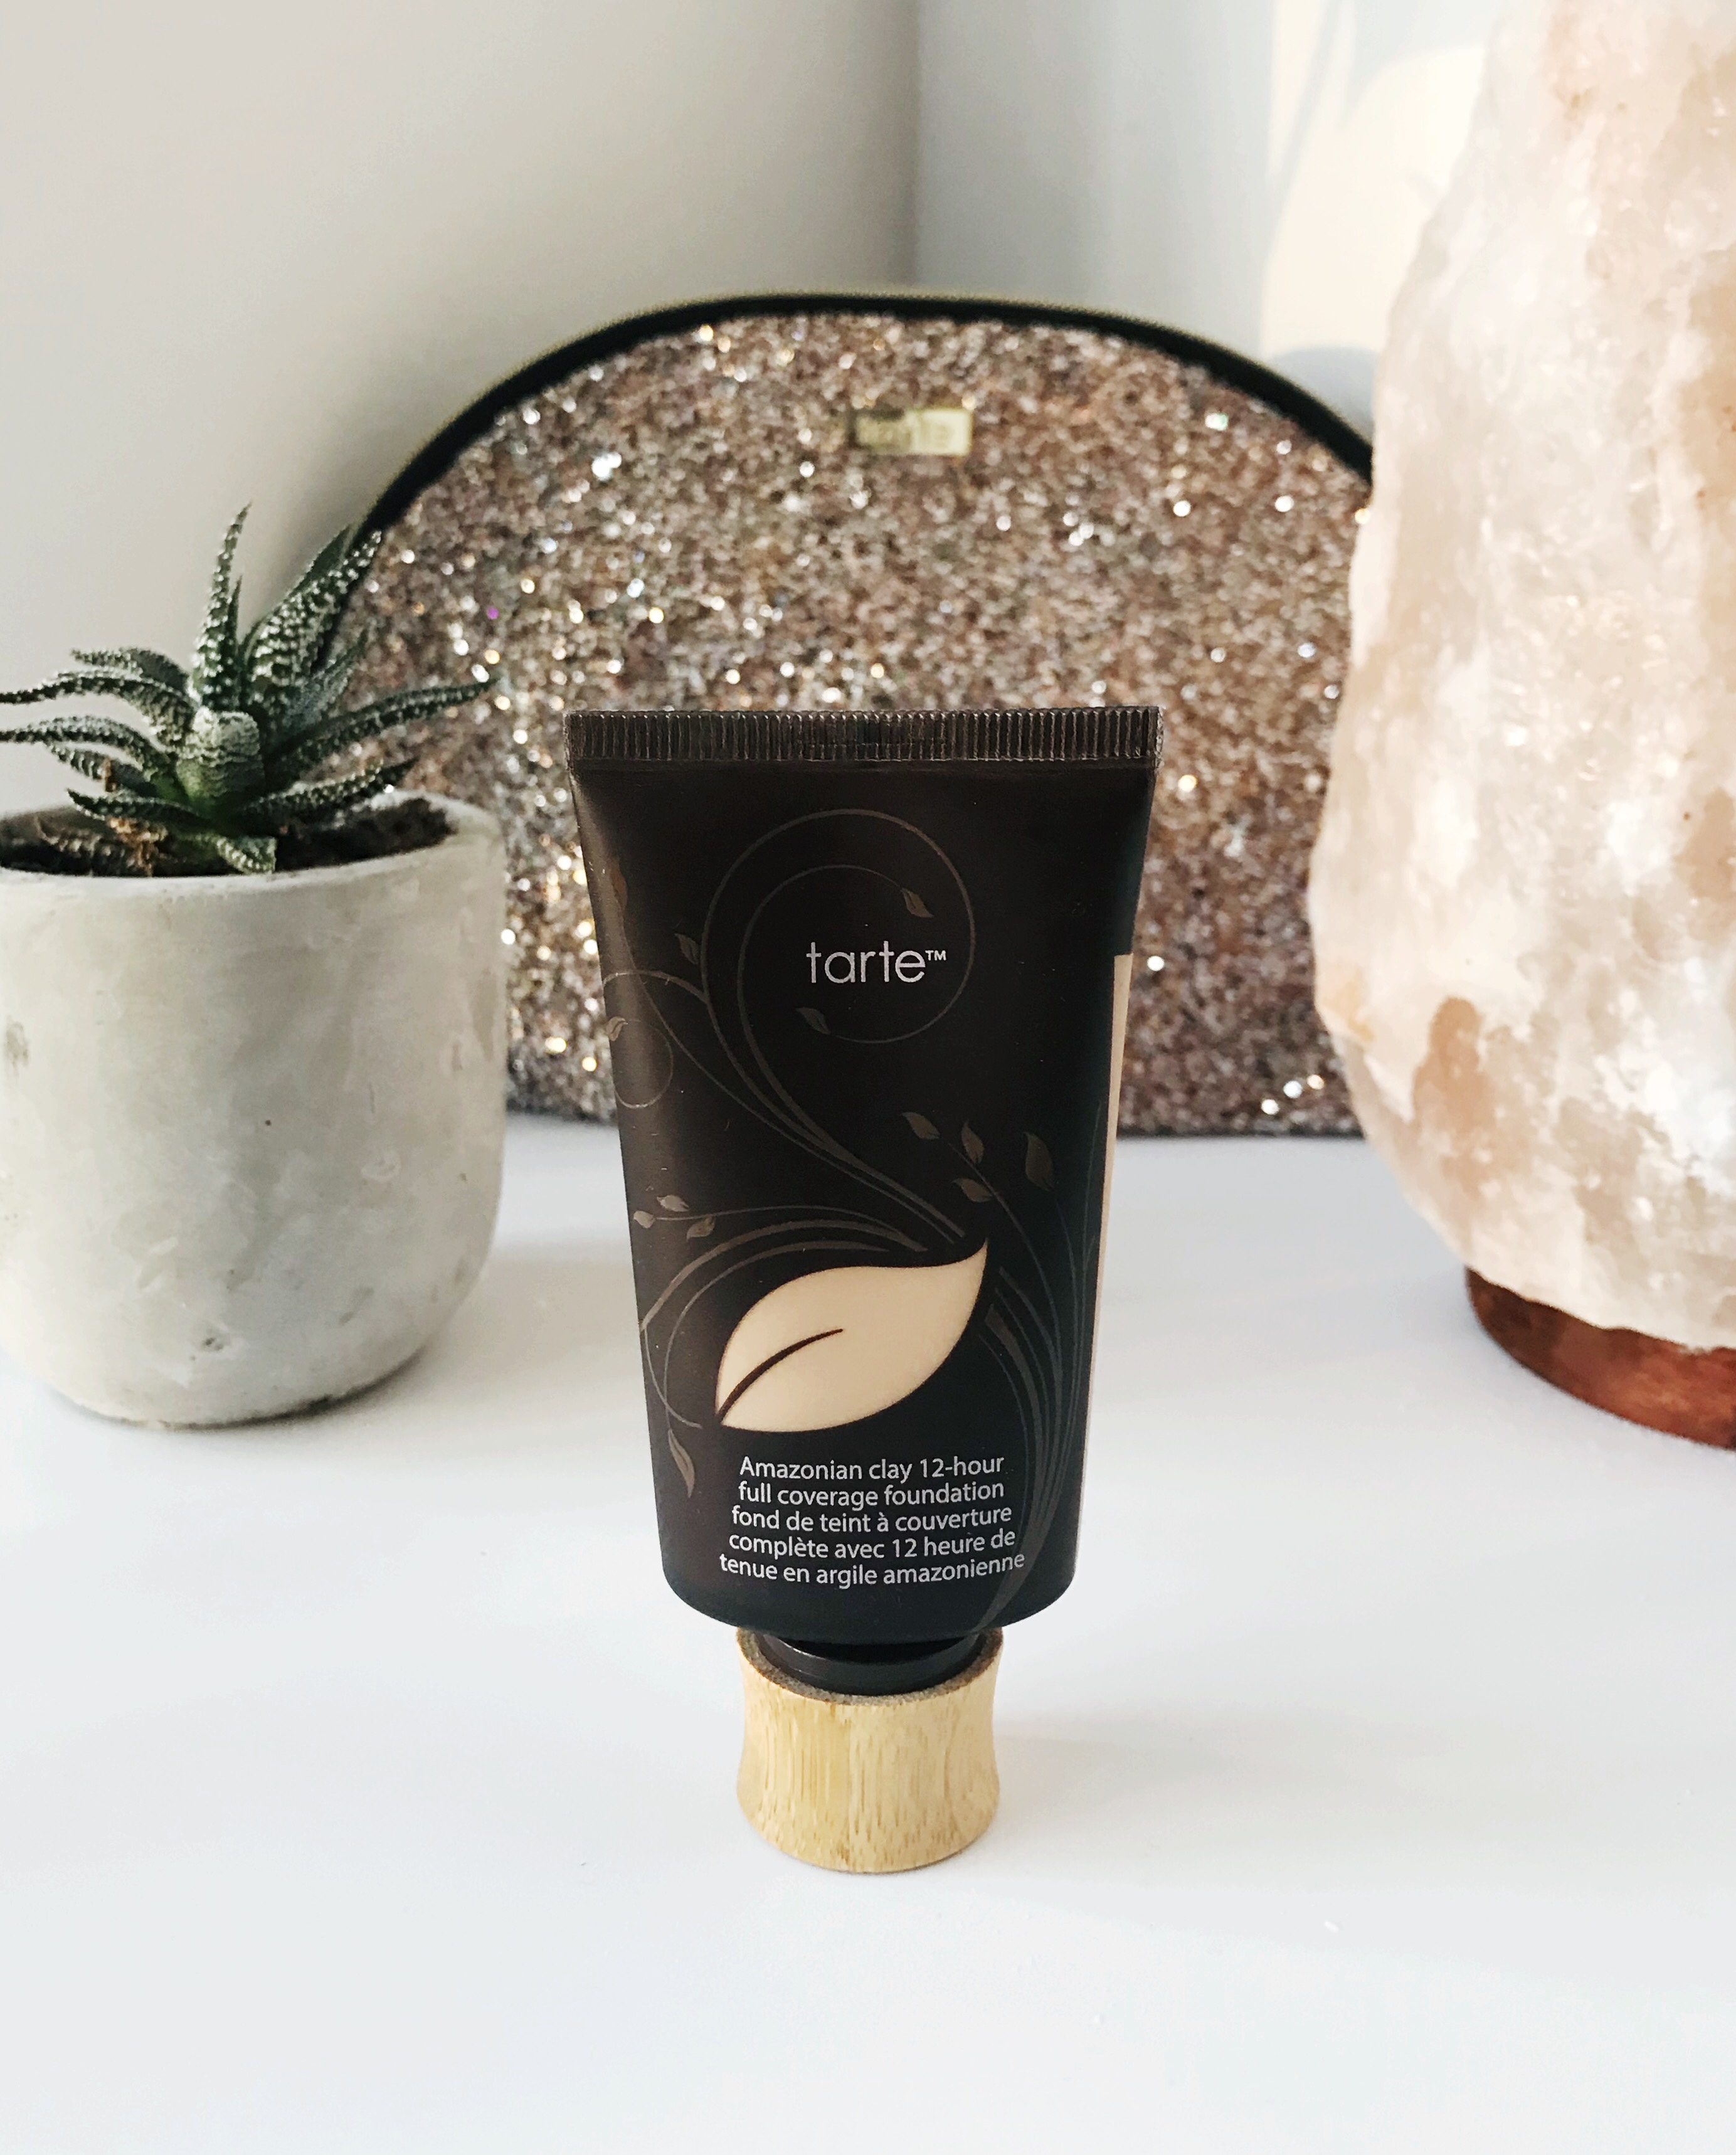
Honestly, I haven’t worn full-coverage foundation in YEARS, so I was both incredibly excited and a little nervous to try this product out. I’ve gone through multiple foundation stages in my makeup career — I started off with a VERY full coverage CC Cream by Peter Thomas Roth that was (rather unfortunately) matched quite poorly to my skin tone. However, since then I’ve mostly only ever used light-weight and low coverage products (MAC Face and Body, my current NARS tinted moisturizer, as well as a foundation-free phase). I’ve done a couple testers of full-coverage foundation here and there — but I often find heavy foundation looks cakey, tends to wear off and settle into fine lines. The last few I’ve tested all made me look worse — which is unfortunate, considering I do have relatively nice skin.

My first impressions of this foundation, so far, is that it is incredibly smooth an easy to apply — and it certainly is incredibly long lasting. It doesn’t have the heavy feel that many other full-coverage foundations have, which is also nice. It certainly covered up any blemishes or discolouration in my skin tone, though it did seem to somewhat amplify small flaws and other features of my face (ie. peach fuzz, dry patches, texture etc.). However, I’m starting to accept that may just be how full-coverage foundation is. Overall, I’d say I’m pretty impressed with this foundation — it won’t necessarily be my every-day go-to, but for nights out when I want a full-glam look it’ll definitely be exactly what I need.

Product: Amazonian Clay 12-hour Full Coverage Foundation in shade 16N (Tarte|Sephora)

Smooth Operator™ Amazonian Clay Finishing Powder

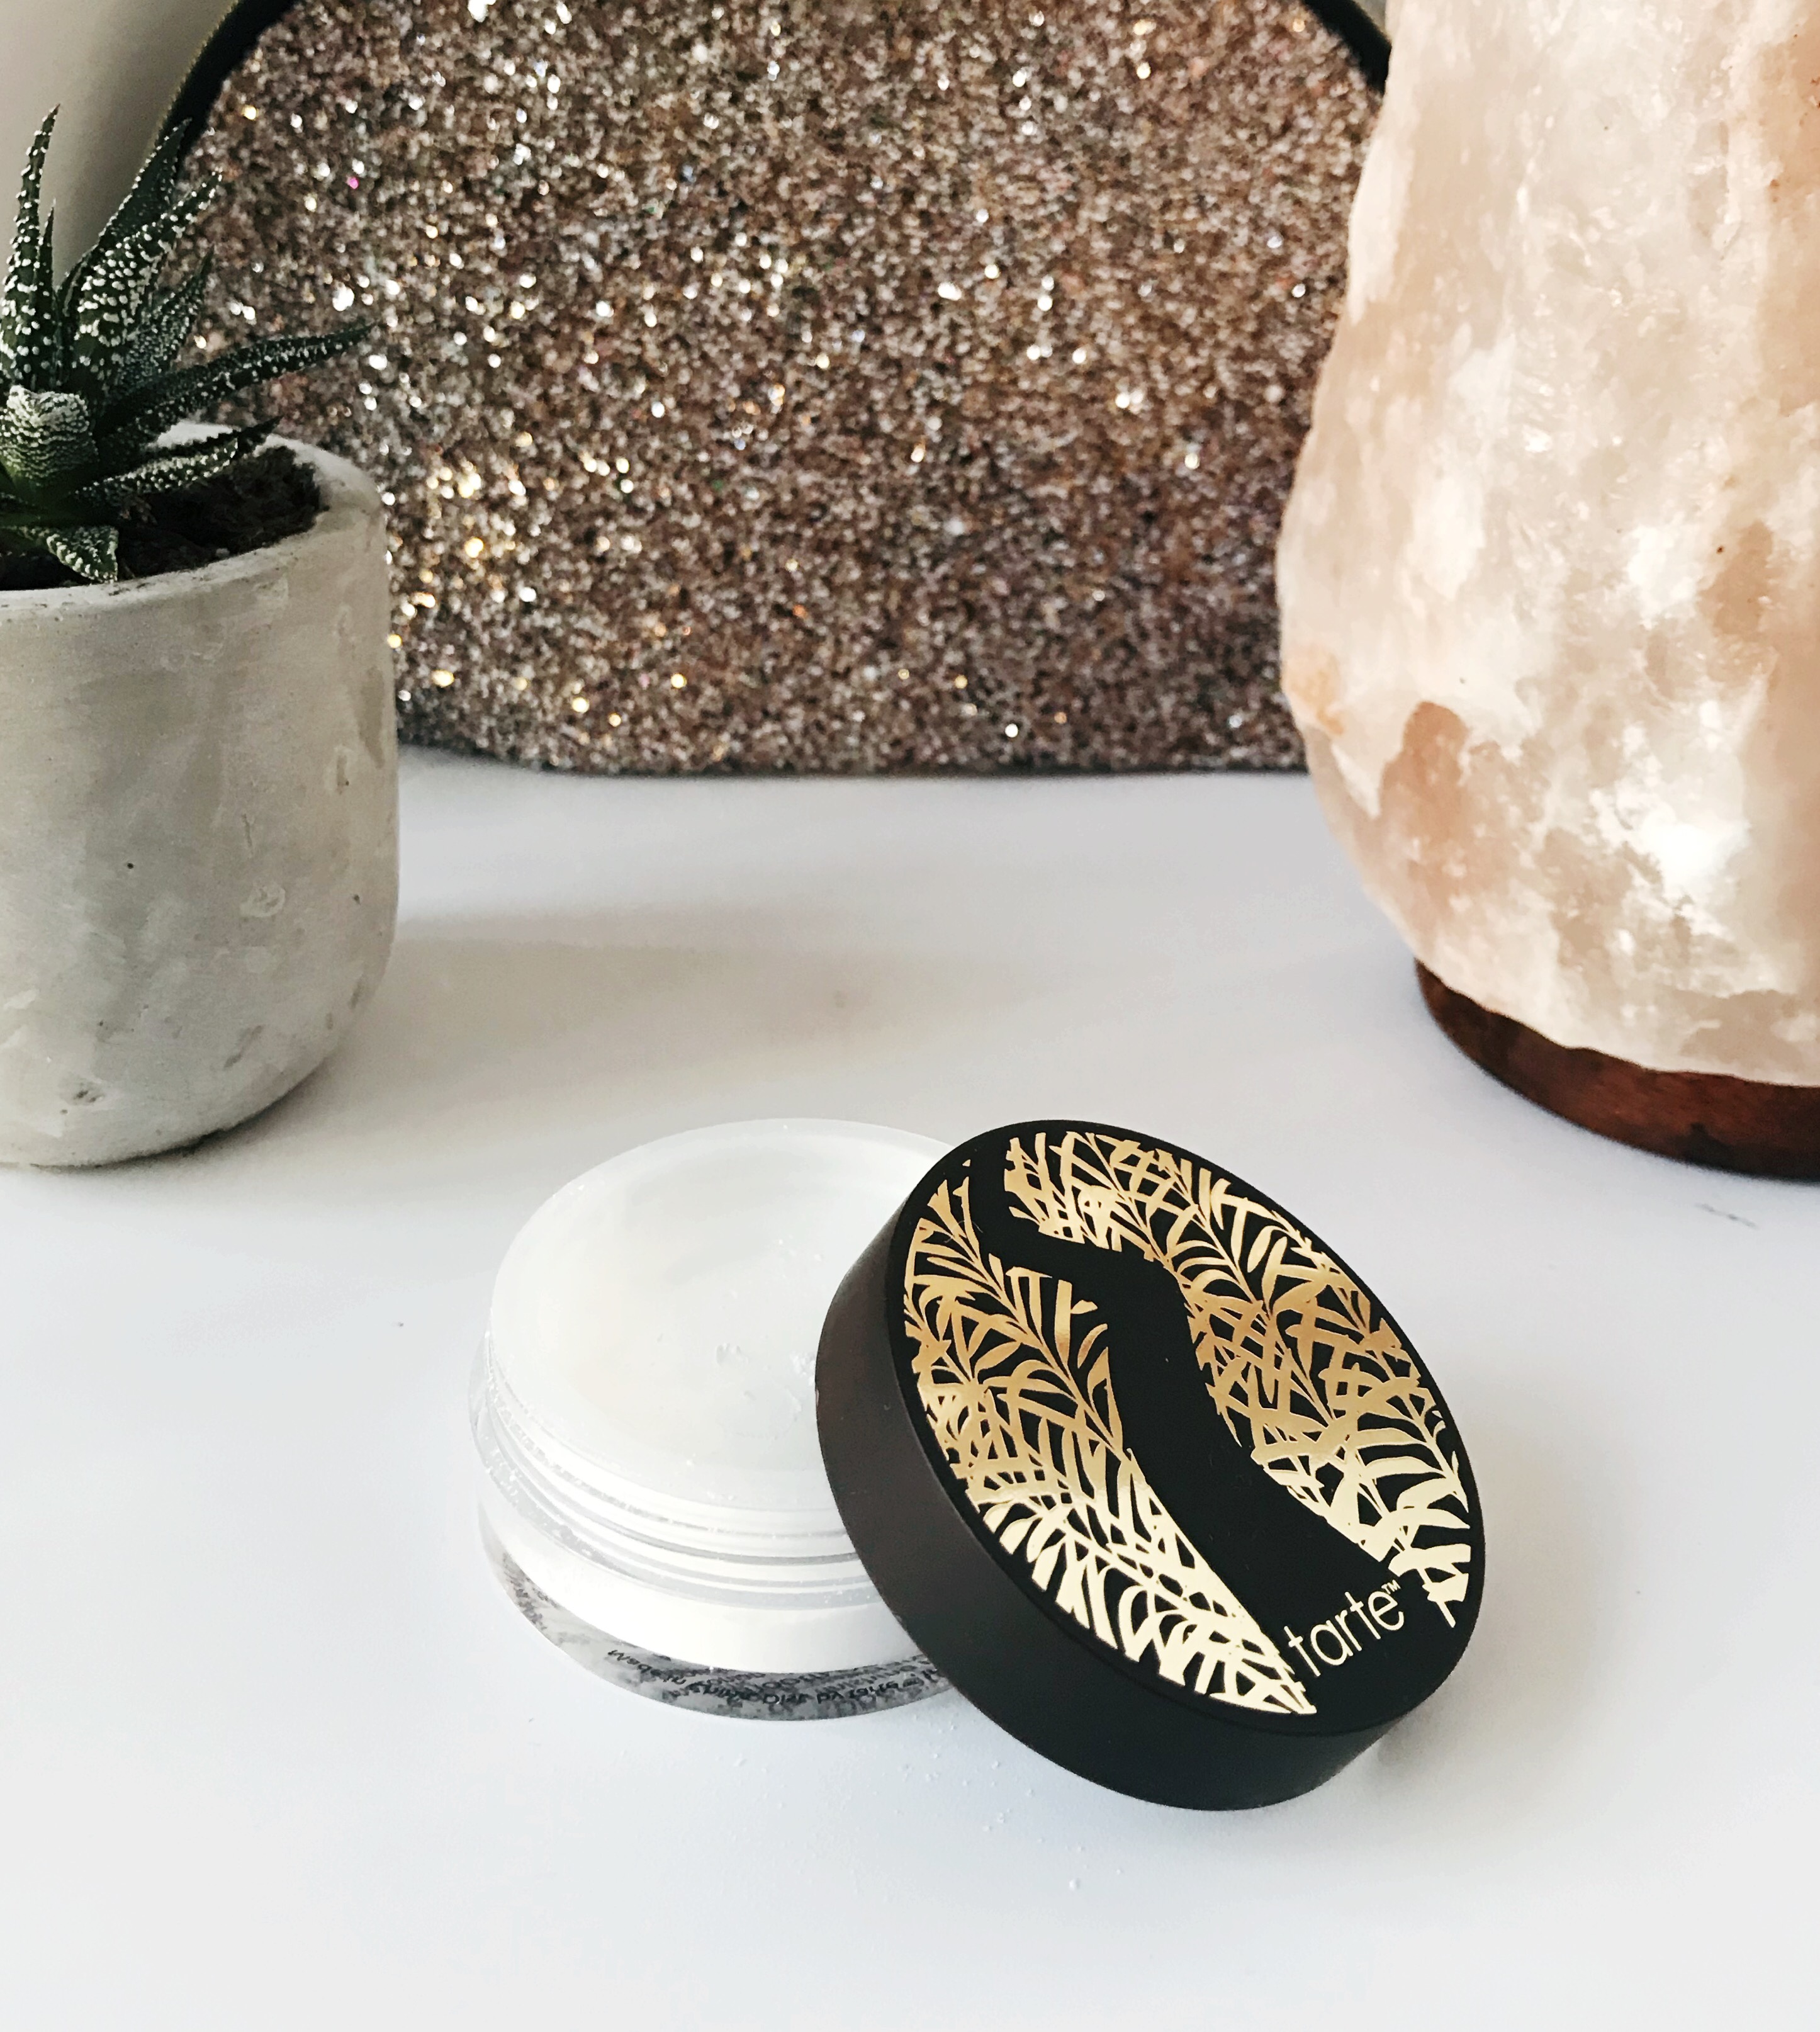
This one was a real blessing to find as an option for this kit as I’ve been DYING to try a new setting powder. I’ve been absolutely married to my Laura Mercier powder ever since the very first time I ever set my makeup, meaning I’ve actually never once tried another product. It was working for me, so I didn’t really see the point in switching — finishing powder is invisible, so what difference would it make? However, especially since I’ve begun baking my makeup, I’ve really started to notice how drying it can be — it can be rather unflattering as I already have skin that airs on the drier side.

Unfortunately, my first impression of this powder is that it is, sadly, even more drying than my other one. That being said, I’ve only been able to test it out once. When it came to baking, not only did it seriously dry out my under-eye area, but the excess powder stuck right on and took a whole lot of effort to wipe away. Even once I thought I got it all, I stepped into the dimmer lighting in my room I realized there was still a load of powder stuck to my concealer. Overall, sadly, my first impressions weren’t great — but I’m going to give it another shot, and I’ll be sure to update this post if anything changes!

Product: Smooth Operator™ Amazonian Clay Finishing Powder in shade White (Tarte|Sephora)

Clay Pot Waterproof Shadow Liner

This was also a godsend find as I’ve been really needed a good gel liner. I’m going to be covering this a little more in future posts, but as I’ve been getting back into doing winged liner I discovered (by suggestion from my friend Amanda) that winged liner is much easier to apply with a brush than it is with a felt-tipped pen. After struggling to draw wings on well with one of my old high-school favourite products, Amanda mentioned how she could never do winged liner (which she wears nearly every day) with a pen — brushes really help to create a smoother line and draw on a lot more easily.

Now, I’ve only used this liner once, but I’ve got to say — I was pretty blown away by it. It’s smooth, dark, and applies super easily — I got my wings drawn in in record time. The only downside is it seemed to be a little thick, making it hard to apply in delicate areas. However, for the actual winged part of may liner it was incredibly easy to use (and I just drew the other areas I struggled with in with a felt tip liner pen). As well, this may just be a bit of a learning curve for me and less so a flaw in the product, so overall I’d definitely have to recommend this liner to anyone who loves their liner winged out and extra AF.

Product: Clay Pot Waterproof Shadow Liner in shade Black (Tarte|Sephora)

Lights, Camera, Flashes ™ Statement Mascara

Okay, we all know how much I love the Tarte Lights, Camera, Lashes 4-in-1 mascara. I could go into it all over again, but I think you guys have heard me rave about it enough. While it was an option in this section, I decided to branch out to a different mascara for once, which I know I mention I often regret — but considering the deal I was getting in this package combined with the fact that it’s just a different version of the same product, I felt pretty safe trying something new.

Since I actually just bought a brand new mascara only a month ago, I’ve actually decided to save this one for a little and test it out at a later date as to not waste product. However, I can say with confidence it should work out just fine, considering it’s simply a modified version of one of my all-time favourite mascaras.

Product: Lights, Camera, Flashes ™ Statement Mascara in Shade Black (Tarte|Sephora)

Color Splash Lipstick

While I wasn’t in any sort of dire need for a new lip product, I’m certainly not one to ever turn one down. As well, I’m a huge lip gloss type of girl — its been a while since I bought a proper nude lipstick. I was THIS CLOSE to just getting another gloss, but I figured this was a staple I’d get more use out of — especially since I don’t really have many lip sticks.

I do have to say, I was really happy with the variety of products they offered here — there was matte liquid lip, matte lipstick, regular lipstick, gloss — and maybe more that I don’t even remember. This was great for me as I’ve never been too much of a matte fan (sometimes I’ll jump for a matte lipstick, but I’m awfully specific about the formula and would need to try it in person before purchasing). However, whether you’re a matte, gloss, or just plain lipstick fan — this kit had a product you’d be content with.

I’m glad I decided to switch it up and get a lipstick, too, because this lip stick is AMAZING. First of all, the colour is just perfect. As well, it’s seriously pigmented, not at all heavy or sticky, and incredibly long lasting. 10/10, could totally get me back into lipsticks.

Product: Color Splash Lipstick in shade Set Sail (Tarte|Sephora)

Paddle to Perfection Foundation Brush

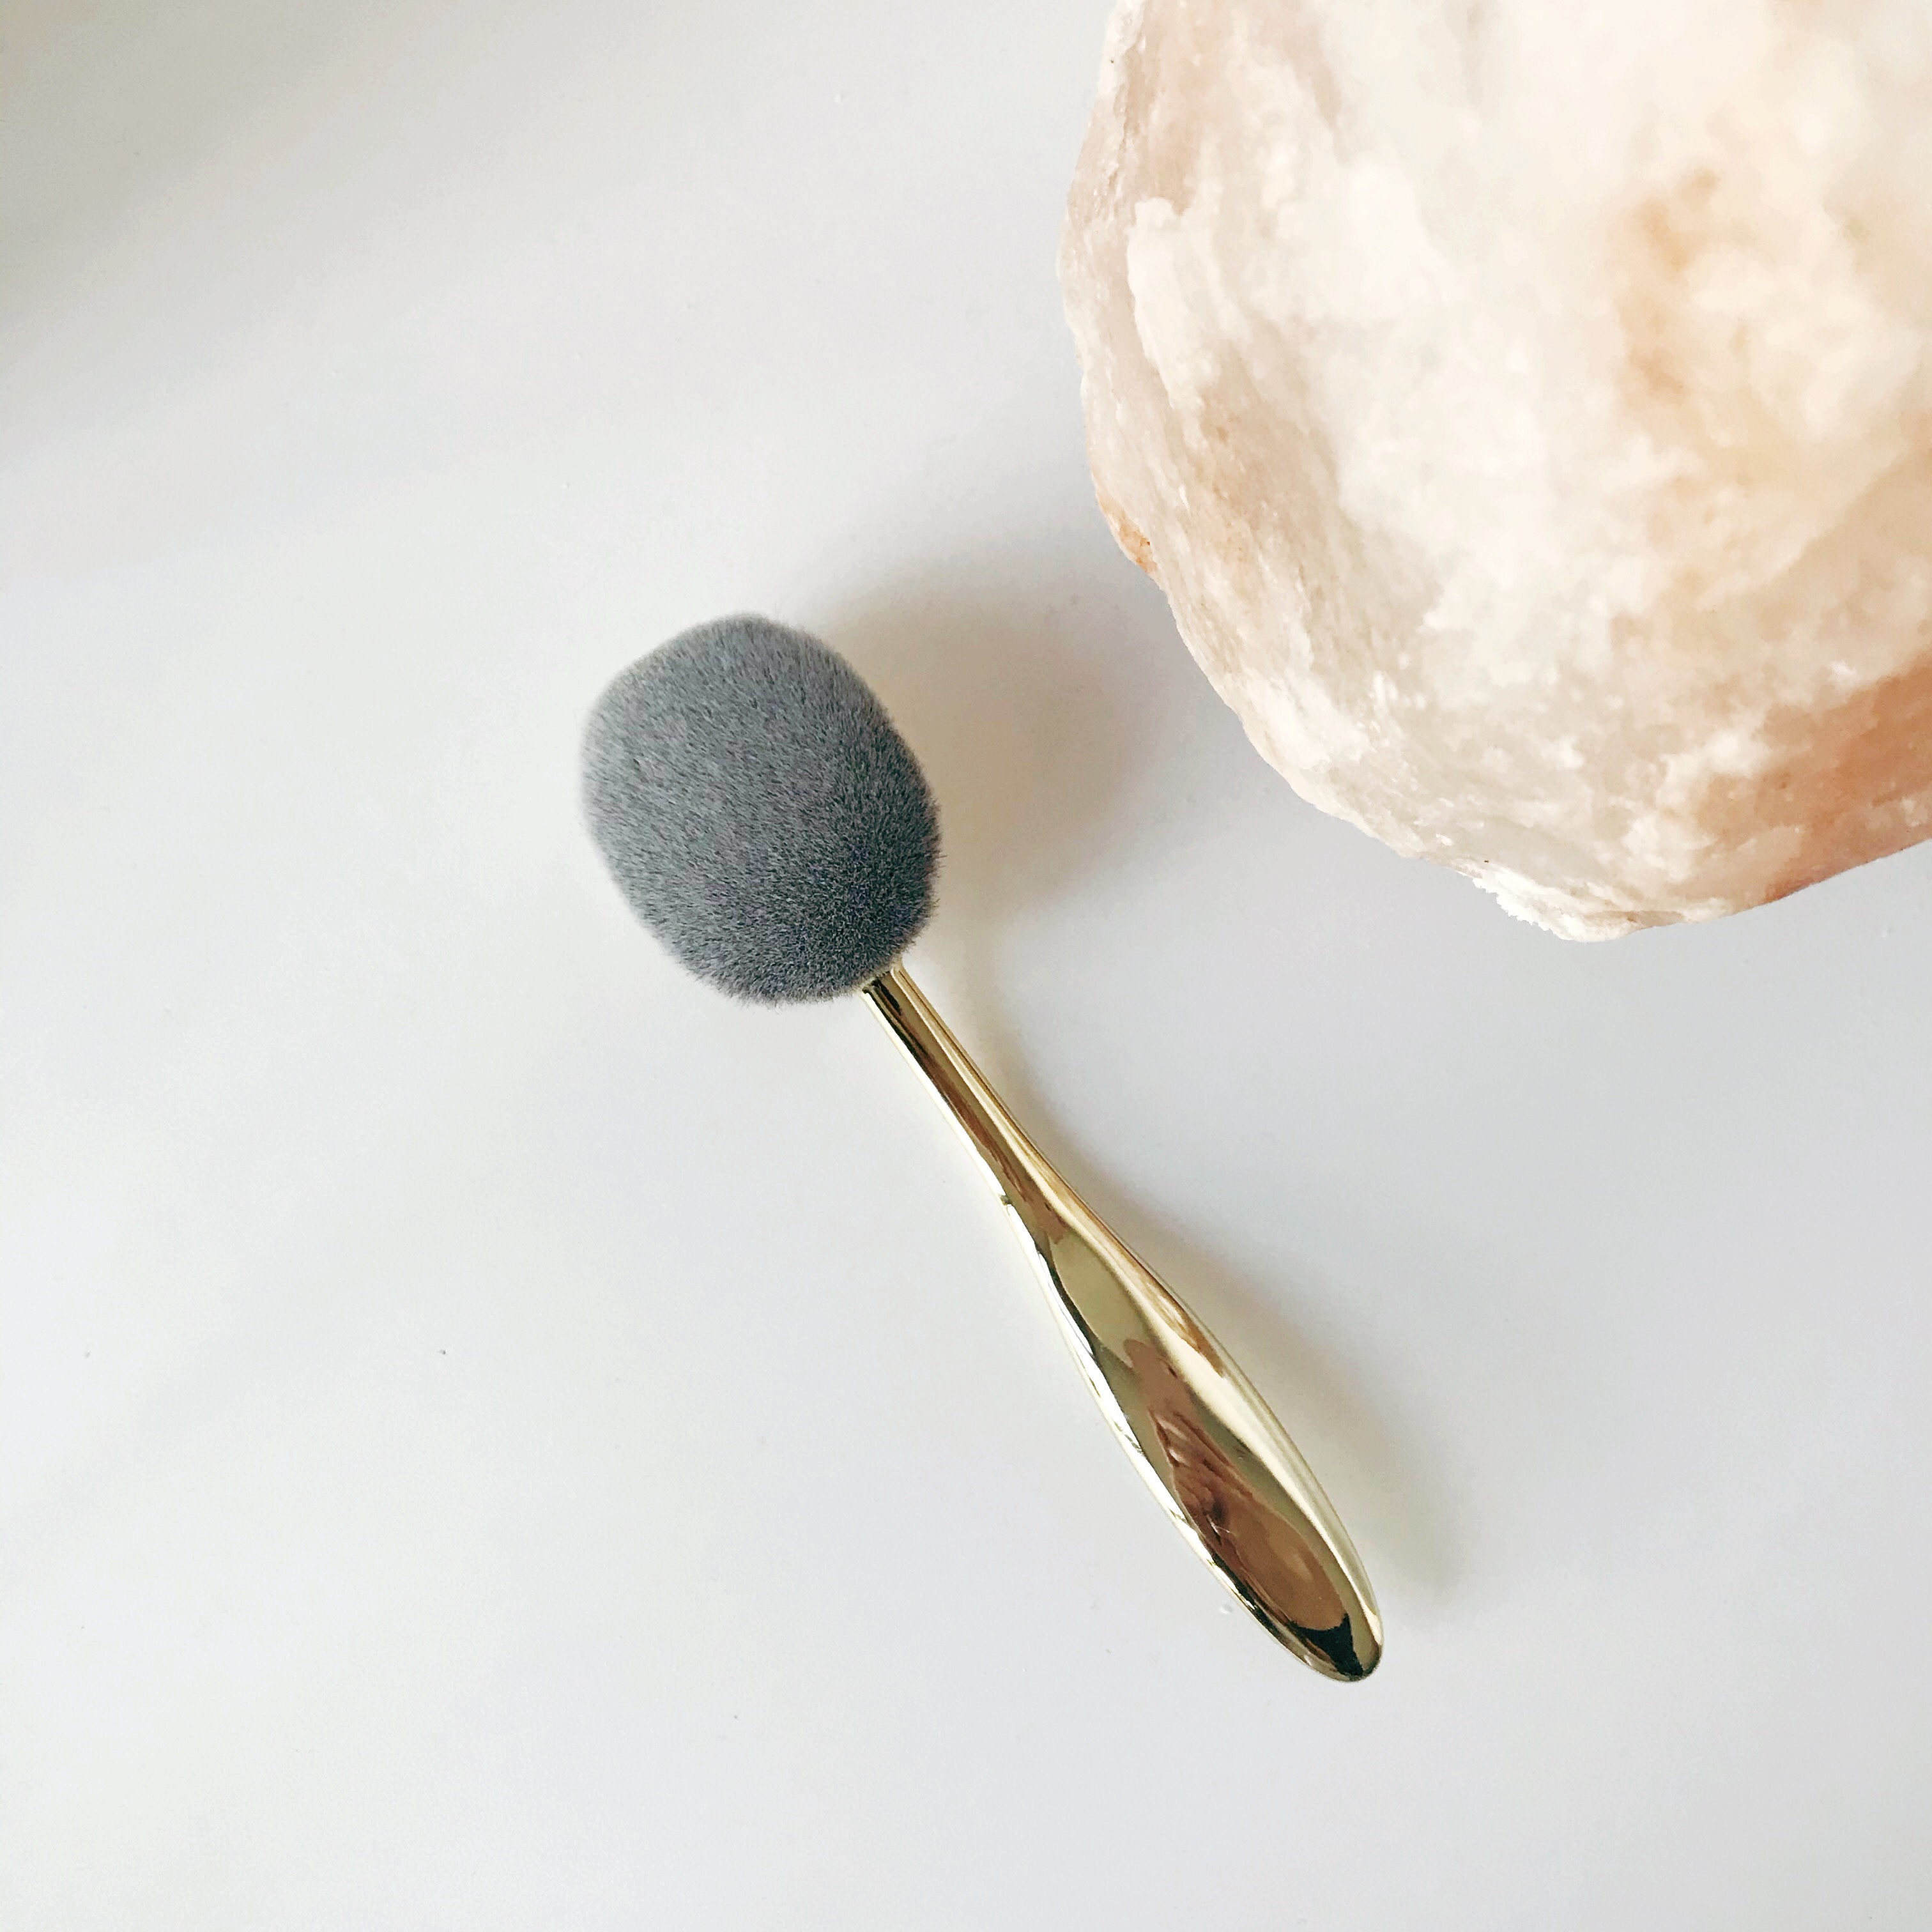
This was another product I’ve just been dying to satisfy my curiosity on. I’ve been seeing these paddle brushes all over the internet for years now, but I’ve never gotten the chance to test one out. I absolutely love Beauty Blenders, and especially since I don’t ever use full-coverage foundation, I’ve never really needed a brush to apply foundation. However, both because this kit gave me the option, AND the foundation to properly test it out with, I’m finally getting the chance to give this brush a go!

Let me just say, if you don’t have one of these brushes in your life, go out and get one ASAP. This brush applied my foundation SO smoothly and seamlessly in a record breaking short period of time. It’s so soft and smooth too, it feels like heaven blending your makeup into your skin. I’m not 100% ready to give up on my Beauty Blenders just yet, but just trying this brush one time has me considering it.

Product: Paddle to Perfection Foundation Brush (Tarte)

Overall, I’m super happy with this kit and I’m so glad I finally decided to purchase one. At just $84, it would be pretty hard for it to be disappointing, but this kit introduced me to so many new products I will 100% be purchasing again in the future. While some of the products may not have had mind-blowing results the first try, it may just take some getting used to with stepping out of my comfort zone and trying things I don’t usually incorporate into my makeup routine.

If you got a Tarte Custom kit recently, I’d love to hear what you chose to add to your kit and how your products worked for you! If not, I hope this post inspires you to try out one of your own next time around.

Hope you’re all having a lovely weekend, and be sure to stay tuned for my new post tomorrow! I’m so excited to share it with you all!

Xo,

Meredith

Thursday Favourites: November 21st

Sephora Clean Up Nice Brush Cleaner Spray and Vera Mona Colour Switcher

Hey y’all!

A quick little update first — since my Tarte Custom Kit already arrived, I figured I would share my post on it this Saturday, instead of two posts on Sunday like I initially planned. I don’t want to overwhelm y’all with too much content, or have either of them get lost in the mix, so I’m spacing them out a little! Sooooo, be sure to check back in Saturday AND Sunday this weekend for some exciting new content!

This week I figured I’d share another post on how to maintain your brushes. Last week, I discussed my new favourite brush cleaner, but what about maintaining your brushes in between cleanings?

For this, I have two favourite products — one to keep your brushes clean and disinfected, and one to help remove excess pigment between colour switches.

First of all, consider where you keep your brushes. If you’re lucky enough to have a desk or vanity like I used to, maybe this isn’t AS big of a problem for you. However, if you’re like me, and do your makeup in the bathroom — consider how dirty your brushes may get daily. Bathrooms, no matter how clean your keep them, are FULL of all kinds of nasty bacteria and germs. Doesn’t sound like something you want to be rubbing into your face (and eyes! Yikes!) on the daily.

A quick and easy solution I’ve found to this is Sephora’s Clean Up Nice Antibacterial Spray. I spray this product on my brushes daily, whether I’ve used them or not. This helps to ensure your brushes are nice and clean — free of any harmful bacteria that may be causing you to break out, or worse. All it takes is thirty seconds of your time, and you know your brushes are perfect and fresh every time you use them!

Another problem I’m sure many of us have encountered is when you’re trying to create a bold eyeshadow look, only to find you need to reuse a brush you JUST coated in a completely different colour. For this, I’ve recently began using the Sephora Collection Color Switch By Vera Mona Brush Cleaner Mini. Rather than rubbing off access powder somewhere you shouldn’t, you can just rub your brush around this little sponge, and it’ll do all the work for you. If nothing else, it’s certainly a lot less damaging than scrubbing your brushes into paper towels constantly.

Between these two products, and the Sephora Solid Brush Cleaner I discussed last week (or whichever product of your choice!), you’ll be good to go with sparkly clean brushes every day! No more worrying about harmful bacteria or struggling with breakouts. You’re brushes will look and feel good as new.

If these sound like products you’ve been needing in your life, be sure to check out Sephora’s Clean Up Nice Antibacterial Spray here, as well as their Color Switch Brush Cleaner Mini here!

Hope you’ve all been having an amazing week so far! Be sure to check back in this weekend for BOTH my Tarte Custom Makeup Kit Unboxing and the first part of my upcoming Holiday segment. I hope you’re all as excited as I am to share them with you!

Love,

Meredith

Heatless Hair Curlers: Love It Or Leave It?

Beachy Waves With Heatless Hair Curlers

Hey everyone!

So to preface, I apologize for the lack of quality in this week’s posts photos — I wasn’t intending this post for this week, and therefore had to prep photos for this super last minute. However, this means that next week you’ll be getting TWO posts on Sunday, so stay tuned for that! And, without further ado, lets get into it!

This weeks post is for everyone out there who LOVES curly hair, but can’t style their hair to save their life, or anyone trying to avoid heat damage to their hair at all costs.

One fact that I’ve found to be almost universally true is that almost everyone who’s outstanding at a certain aspect of beauty now, started with it young and went through all the terrible learning phases while in high school, meaning they came out into the adult world already having that skill down. Every makeup expert you know probably went through a number of TERRIBLE eyeshadow or brow phases back before the age of Instagram. Every fashion guru probably has an album stashed away of mildly embarrassing photoshoots of themselves in tacky 2000’s style outfits. And every girl who’s seemed to master casual, every day waves has probably owned a flat iron and curler since they were in middle school.

I, however, had short hair for most of my grade school days. After cutting off over twelve inches of hair to donate to cancer wigs when I was eleven years old, I was so taken with my newfound short hair after YEARS of being obsessed with having it as long as it would be that I kept it that way until the twelfth grade. Sometimes it looked cute, a lot of times it looked terrible, but most notably it was too short to do anything special with — much to my dismay every time a fancy event rolled around and I wanted to do my hair. It was uncurlable, and took every hack in a hair stylists book if I ever asked for an updo.

As such, I really never learned how to do my hair or thought to incorporate it into my daily routine — a fact that still haunts me to this day. OKAY, maybe that’s a little dramatic but not only do I always underestimate/forget how much time I’ll need if I want to make my hair look nice before leaving the house, but I also, for years, had NO IDEA how to do anything as basic as even curling my hair. Luckily, with years of trial and error and tips from my hair dresser I’ve gotten a lot better, but i’m still far from being excellent.

This is all exactly why I was so curious when I came across a review on Buzzfeed absolutely singing praises for these heatless hair curlers. People were absolutely raving about them and how simple they were. On top of that, anything I can do to reduce heat damage to my bleached-out ends sounds amazing.

Heatless Curlers

Still, I was pretty skeptical. I tried heatless curlers once before (but a very different style) and it was an absolute mess. Still, after reading enough reviews, I decided to just take the leap. Thank god I did — these curlers are AMAZING. Not only are they super easy to use, you can sleep with them in and it’s not even uncomfortable. They give the same look as using a curling wand, and only a little bit more effort. The only downside is that you do have to wait — it’s not as instantaneous as heat curlers. However, if you’re prepared to sleep with them in it’s no problem — plus, if you take the time to put them in before doing your makeup you can still get a great curl out of them.

As well, your hair should be at least a little damp first. You don’t want to have your hair totally wet either, and it’s a little hard to find a good medium, although freshly blow-dried hair should work just fine. I learned the hard way today that if you don’t dampen your hair first the curls don’t last nearly as well — a good learning lesson but a little unfortunate as I was using them to take photos for this post.

The final result of these curlers is stunning though — it looks just the same as if you spent all kinds of effort with a wand (just minus the burns). I tend to use the medium-large ones to get a more natural wave, but if you’re looking for a tighter, ringlet-style curl this pack includes curlers small enough to give you that exact look. These curls hold fantastically too — which I was incredibly surprised by. Maybe it’s just my lack of knowledge when it comes to hair styling, but I always thought heat was essential to a curl’s hold. Turns out that’s not the case at all — these work fantastic without frying your strands.

The Final Result!

If this sounds like the product you’ve been needing, be sure to check them out on Amazon here!

Be sure to stay tuned for a two-special post next week — my Tarte Custom Makeup Kit unboxing, as well as the first part of my surprise 3-piece holiday segment!

Hope you’re all having a lovely week,

Meredith

Thursday Favourites: November 14th

Sephora Solid Clean: Solid Brush Cleaner

Happy Thursday everyone!

I think it’s almost universally true that most people hate washing their makeup brushes. It’s time-consuming and can be difficult, depending on what product you use. A few years back, someone told me the best, cheapest and easiest product to use was plain old Dove body wash — a hack I stuck to for years. Well, yes, it did a fine job of washing my brushes, there was a whole lot of downsides. The main one was it was difficult to use — I ended up making SUCH a mess every time I had to clean my brushes. On top of that, it never seemed to do any damage to my brushes, but it’s not a product meant for them — so who knows how much help and harm it was really doing.

Honestly, it made cleaning my brushes a challenge and turned it into a chore I often avoided — which, as we all know, is bad for your skin, brushes, and makeup application. After years of using this product, I’d finally had enough — so I logged onto Sephora and started doing some research.

There are legitimately endless products on Sephora’s online store meant to wash brushes — it was a little overwhelming, honestly. Not only does the Sephora line carry all sorts of products, but there’s other lines as well — and products such as those electronic brush cleaners, silicone brush cleaning pads, and more.

After reading through what felt like endless reviews, I settled on buying Sephora’s solid brush cleaner. It seemed to have the best reviews, price (it’s only $10.50!), and came with it’s own little silicone washing pad — which was a huge bonus. The idea of brush cleaner being solid was a little foreign to me, but I still decided to give it a shot.

Maybe it’s just because I spent years cleaning my brushes without the proper products, but this brush cleaner makes my life SO much easier. From the moment I started using it, I was sold. It’s incredibly easy, fast, clean, and honestly — it’s even kind of fun. This product seriously cleans your brushes in seconds, with minimal mess as it comes in a container to help keep from getting water all over your counter.

On top of that, the Argan Oil in this cleanser help to condition your brushes, which left them feeling soft and fresh. There was no residue left on my brushes whatsoever — it left them feeling good as new for the first time in years. (Plus, it’s formulated without parabens, sulfates, and phthalates which is huge plus!)

If this sounds like the brush cleaner you’ve been needing in your life, be sure to check it out at Sephora here!

I hope you’re all having an amazing week! Just one more day left until the weekend, hang in there.

Much love,

Meredith

Spend A Weekend With Me In Toronto!

Toronto, Canada

Hey everyone!

As some of you may already know, I spent this weekend travelling back to Toronto to spend with my family. While it was only a short trip, we still managed to pack a lot into the two and a half days I spent there. When I arrived, it seemed winter was already in full swing — not only was the weather super dry and chilly, there was already snow on the ground (which isn’t very common for Toronto Novembers). However, I still managed to make the best of the situation, with a lot of food-based restaurants and activities I have to share — for those of you looking for somewhere to plan your next weekend getaway, living in Toronto and looking for new suggestions — or just those of you curious about how my weekend went!

Meet Dmitry!

My baby, Dmitry

First of all, and most importantly — I wanted to introduce you all to my cat, Dmitry! He’s a one-year old Siberian Forest Cat, and he’s my little baby. Admittedly, I do spend a lot (if not most) of my trips home hanging out with Dmitry rather than exploring the city. (Can you blame me though? Look at that face!).

As a little introduction, Dmitry is very sweet and loving, but also a little high strung — very fond of our family and quite weary of strangers. He loves treats, whipped cream, and surprisingly enough — anything “cheese” flavoured (but not cheese itself). He’s an indoor cat, but he loves to sit on the window sill and watch squirrels. And — most importantly — he loves belly rubs.

But without further ado — lets get into the rest of the weekend!

Dinner At Montecito

Lobster Spaghetti at Montecito

This restaurant was absolutely fantastic. From start to finish — the atmosphere, the drinks, the food — just overall, it was a great experience. I had some lobster pasta that was literally just a delight — and the cocktails (while strong) were both inventive and delicious. If you need a downtown restaurant in Toronto to try out — be sure to add this place to the list.

Girl From the North Country

Set of Girl From The North Country

My mom and I spent Friday night going to see the production Girl From The North Country. It’s been an awfully long while since I’ve been to the theatre, but I used to go all the time. The storyline and production of this play was heartbreakingly beautiful — however, the best part by far was the music numbers and simply INCREDIBLE vocal talent of all the actors. The play is based on the music of Bob Dylan, so all the music was already incredible — but the singing was just next level. If you’re in Toronto and have the chance to see this production, give it a shot — I know theatre may not be your first thought on how to spend a Friday night out, but give it a shot (you won’t regret it, I promise).

Dim Sum at The Rol-San

The Rol-San, Chinatown, Toronto

Okay, if you’re ever in Toronto, the Rol-San is a must-eat. Famous for its All-Day Dim Sum and strange but efficient plastic tablecloths, you’ll seldom see the Rol-San without a line — but trust me, it’s worth the wait. This place has some of, if not THE, best Dim Sum in the entire city. If you go, be sure to get the Deep Fried Shrimp Wontons and the Shiu Mai — SO good.

Brunch At The House On Parliament

Brunch at The House

Okay, I won’t lie, I’m writing all this up for you on the plane home — and this meal is really all I can think about. All the food was absolutely next level — I’d never been here before, but I already can’t wait to go back on my next trip home. The deep-fried cheese curds were like little bites of heaven, and the soup and breakfast poutine I ordered was the most elaborate and incredible meals I’ve ever had. Seriously — you really can’t go wrong with potatoes, poached eggs, melted cheese, double smoked bacon and Hollandaise sauce, but I swear it tastes even better than you’re imagining. Absolutely 10/10, if you need a brunch place to check out in Toronto this is it. Added bonus: the Caesars were pretty fantastic too.

Shopping on Bloor Street

My Lil Sephora Haul

Last but not least, we snuck in a little last-minute shopping before heading to the airport. Shopping on Bloor Street is just a wonderful, uber-classy experience, even if you’re just hitting Sephora like always (we get it, I’m predictable). However, I did treat myself to my first ever Pat Mcgrath Labs eyeshadow palette — which I am SO excited to test out and report back with ALL the results.

And that’s it for my little weekend getaway! Now it’s back to real life for me, unfortunately. I hope you guys enjoyed reading, and if you’re from Toronto or travelling there soon — hopefully you’ve found some good recommendations from this post! If any of you guys are ever heading to Toronto for a visit, feel free to message me for any kinds of suggestions, I’d be more than happy to help.

In the mean time, I hope you’re all having a great week and you’re Novembers have been off to a great start. I have some VERY exciting holiday-themed posts coming up in the next couple weeks for you guys, so stay tuned for that! And in the meantime, have a fantastic week!

Xo,

Meredith

Bonus Pics!!!