Thursday Favourites: January 30th

Hey y’all!

So first off, my apologies for having this post ready for you all a day late — I’m still recovering a little from my bout of the flu, and I’ve had a lot of schoolwork assigned this week so unfortunately that took priority. But it’s all good now — and better late than never, right?

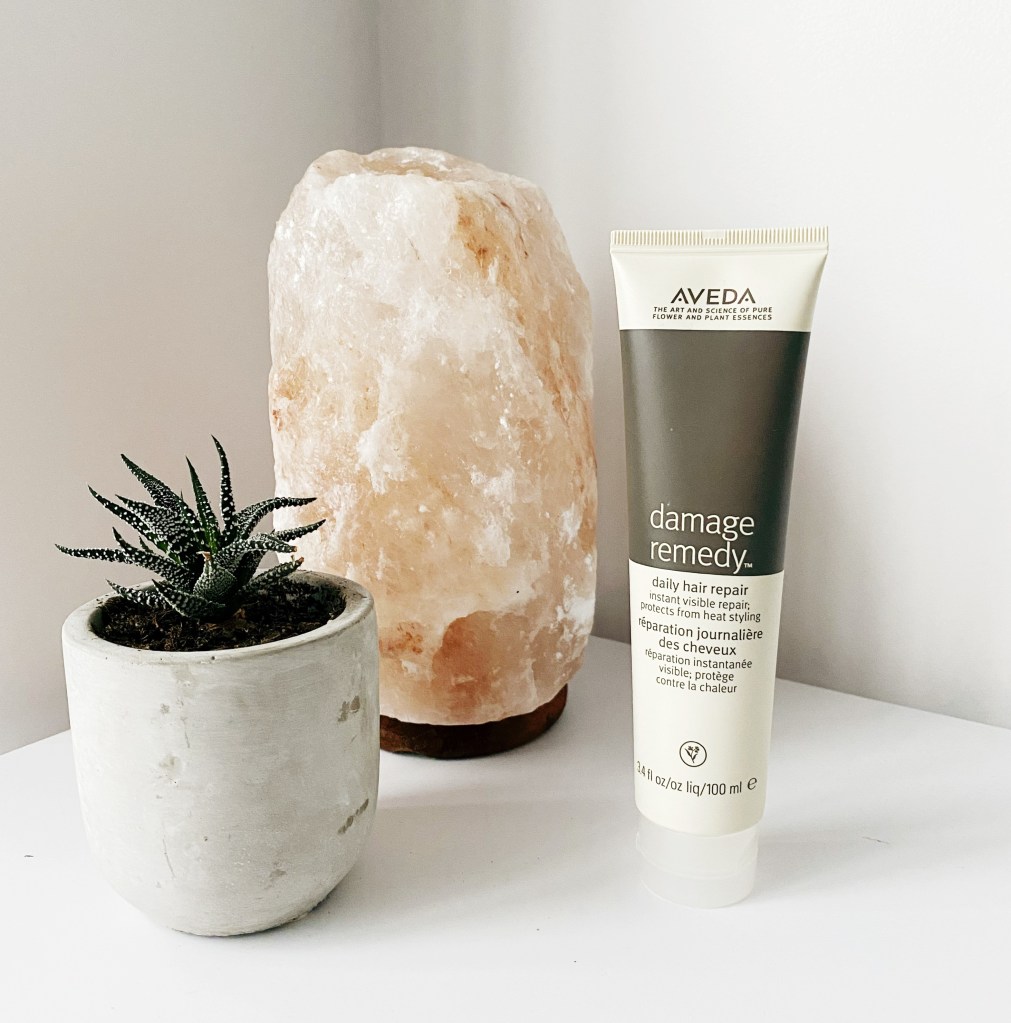
Today, I wanted to share with you all another product I was introduced to through FabFitFun and absolutely fell in love with — the Aveda Damage Remedy Daily Hair Repair. As many of you know, caring for my hair has been a huge struggle for me over the last few years. Back in 2015, I decided to go blonde, and while I don’t regret it one bit it definitely made looking after my hair and avoiding damage a huge challenge. Even now, while I’ve returned to my natural brunette colour, I still have residual damage from my dyed-over bleached ends.

Over the years, I tested out so many products to prevent damage to my hair I almost feel like I’m a bit of an expert now. I tried more masks, sprays, creams and conditioners than I can even count. There was definitely a bit of a learning curve involved — discovering there was more products out there than 10-minute hair masks, noticing how some products worked much better than more for others — and most importantly, realizing that leave-in products should NOT be leaving my hair feeling sticky, heavy, and gross.

For a while, I avoided leave-in products for this very reason. It honestly seemed like most of them were more likely to leave residue behind in my hair than actually fix any problems. To be completely honest — I’m not even sure I would have ever tried a product like this one if FabFitFun hadn’t introduced me to it (but I’m so, so glad they did!).

What really makes this product work is how light it is. It’s not really a cream, or even a gel — its a consistency I’ve never come across before. It’s uber-lightweight and almost seems as though the base is made of water — so as soon as you smooth it over your damp strands, it blends right in.

Honestly, I was blown away by the results the first time I ever used this product — it left my hair so unbelievably smooth and soft. I hadn’t had my hair look so shiny and healthy in YEARS. With time, I’ve only grown more sold on it, too. While I received this product in a Fall 2019 FabFitFun box, to this day I had yet to have this product leave my hair feeling greasy, sticky, or negatively effected in any way. There’s been a couple of occasions where I’ve poured some out before blow drying and thought to myself “whoa, that is DEFINITELY too much product”, and yet I still haven’t had any classic leave-in products results. While so many other leave-in products in the past may have helped with the downside of leaving my hair covered in residue or just otherwise feeling a little nasty — this product has all of the benefits, and so far no downsides.

Does this sound like the hair product you’ve been dying to try? Check it out on Aveda’s website here!

Happy last day of January, everyone! I hope you all had a great month and managed to achieve your goals. I’m personally beyond excited for February — I have a lot of big plans that I can’t wait to put into action! What are your February goals? Drop a comment below and let me know!

Xo,

Meredith

Thursday Favourites: January 23rd

DryBar Prep Rally Spray

Hey guys!

This Thursday I’m going to be covering a product that is still relatively new to me — which only speaks to how quickly I’ve fallen in love with it. While I only received the Dry Bar Prep Rally Spray in my Winter FabFitFun box only two months ago, I already know that I’m going to be repurchasing this product as soon as I use it up.

Before receiving this product in my box, I’d been searching for a long (like, seriously long) time for a good, go-to heat protectant spray. For the longest time my go-to was the Pureology Colour Fanatic Beautifier Spray — my hairdresser sold it to me, and I really didn’t know enough about hair products to know if I even liked it or not. While it certainly was a good product — in retrospect it became heavy and sticky quickly just by spraying in the tiniest bit too much. However, upon switching to a Vancouver hairdresser Pureology became increasingly harder to find (a huge struggle, since it literally used to be the only brand I used on my hair). Ever since then, I’ve just been switching around from one heat protectant to the next, never really settling on something long term.

I was just finishing up a sample bottle of Bumble&Bumble’s Thickening Spray (which was actually pretty good) when I received this bottle. And while the Bumble&Bumble spray was good — this one was better. I believe the hallmark of a good heat protectant is that once your hair is all dried and styled, it should be as if you never sprayed any in at all. There shouldn’t be any stiffness, greasiness, heaviness or stickiness to your hair — but there also shouldn’t be any heat damage whatsoever. Dry Bar’s Prep Rally spray, so far, has met all of these requirements.

Not only does this spray smell fantastic, it’s nice and light too — once you’ve dried your hair, there’s no evidence or feeling you ever sprayed it in to begin with. Really, the only evidence I’ve been using it at all is that my hair remains undamaged since I’ve started using it. While I’ve used products in the past as heat protectants that I felt didn’t leave behind much of a residue — this one really seems as though nothing remains behind at all. My hair just feels like smooth, shiny, soft and healthy hair — as if it were au natural.

Does this sound like the heat protectant you’ve been needing in your life? Be sure to check out DryBar’s Prep Rally Prime & Prep Detangler at Sephora here!

I hope you’re all having an amazing week — we’re just about one week out from the end of January, so be sure to hustle towards achieving all of your monthly goals! Personally, I’m having a bit of a rough week — I came down with the flu on Tuesday and it’s really been taking a toll on me. If you guys have any tried-and-true flu remedies, I’d love to hear them! Drop a comment and let me know what makes you feel better quickly when you’re sick. I have a long week ahead of me — especially considering that I’ve had to take two days to recover already — so I have a lot of catching up to do, on top of next weeks tasks. Wish me luck!

Xo,

Meredith

Heatless Hair Curlers: Love It Or Leave It?

Beachy Waves With Heatless Hair Curlers

Hey everyone!

So to preface, I apologize for the lack of quality in this week’s posts photos — I wasn’t intending this post for this week, and therefore had to prep photos for this super last minute. However, this means that next week you’ll be getting TWO posts on Sunday, so stay tuned for that! And, without further ado, lets get into it!

This weeks post is for everyone out there who LOVES curly hair, but can’t style their hair to save their life, or anyone trying to avoid heat damage to their hair at all costs.

One fact that I’ve found to be almost universally true is that almost everyone who’s outstanding at a certain aspect of beauty now, started with it young and went through all the terrible learning phases while in high school, meaning they came out into the adult world already having that skill down. Every makeup expert you know probably went through a number of TERRIBLE eyeshadow or brow phases back before the age of Instagram. Every fashion guru probably has an album stashed away of mildly embarrassing photoshoots of themselves in tacky 2000’s style outfits. And every girl who’s seemed to master casual, every day waves has probably owned a flat iron and curler since they were in middle school.

I, however, had short hair for most of my grade school days. After cutting off over twelve inches of hair to donate to cancer wigs when I was eleven years old, I was so taken with my newfound short hair after YEARS of being obsessed with having it as long as it would be that I kept it that way until the twelfth grade. Sometimes it looked cute, a lot of times it looked terrible, but most notably it was too short to do anything special with — much to my dismay every time a fancy event rolled around and I wanted to do my hair. It was uncurlable, and took every hack in a hair stylists book if I ever asked for an updo.

As such, I really never learned how to do my hair or thought to incorporate it into my daily routine — a fact that still haunts me to this day. OKAY, maybe that’s a little dramatic but not only do I always underestimate/forget how much time I’ll need if I want to make my hair look nice before leaving the house, but I also, for years, had NO IDEA how to do anything as basic as even curling my hair. Luckily, with years of trial and error and tips from my hair dresser I’ve gotten a lot better, but i’m still far from being excellent.

This is all exactly why I was so curious when I came across a review on Buzzfeed absolutely singing praises for these heatless hair curlers. People were absolutely raving about them and how simple they were. On top of that, anything I can do to reduce heat damage to my bleached-out ends sounds amazing.

Heatless Curlers

Still, I was pretty skeptical. I tried heatless curlers once before (but a very different style) and it was an absolute mess. Still, after reading enough reviews, I decided to just take the leap. Thank god I did — these curlers are AMAZING. Not only are they super easy to use, you can sleep with them in and it’s not even uncomfortable. They give the same look as using a curling wand, and only a little bit more effort. The only downside is that you do have to wait — it’s not as instantaneous as heat curlers. However, if you’re prepared to sleep with them in it’s no problem — plus, if you take the time to put them in before doing your makeup you can still get a great curl out of them.

As well, your hair should be at least a little damp first. You don’t want to have your hair totally wet either, and it’s a little hard to find a good medium, although freshly blow-dried hair should work just fine. I learned the hard way today that if you don’t dampen your hair first the curls don’t last nearly as well — a good learning lesson but a little unfortunate as I was using them to take photos for this post.

The final result of these curlers is stunning though — it looks just the same as if you spent all kinds of effort with a wand (just minus the burns). I tend to use the medium-large ones to get a more natural wave, but if you’re looking for a tighter, ringlet-style curl this pack includes curlers small enough to give you that exact look. These curls hold fantastically too — which I was incredibly surprised by. Maybe it’s just my lack of knowledge when it comes to hair styling, but I always thought heat was essential to a curl’s hold. Turns out that’s not the case at all — these work fantastic without frying your strands.

The Final Result!

If this sounds like the product you’ve been needing, be sure to check them out on Amazon here!

Be sure to stay tuned for a two-special post next week — my Tarte Custom Makeup Kit unboxing, as well as the first part of my surprise 3-piece holiday segment!

Hope you’re all having a lovely week,

Meredith